Download Ubuntu from http://www.ubuntu.com/download/ubuntu/download. Server version is recommended.
Create a bootable usb stick by following the instructions from step 2 of the above page, or using
http://www.pendrivelinux.com/universal-usb-installer-easy-as-1-2-3/
Boot from usb, once Ubuntu is loaded, run the install Ubuntu icon from the desktop.
Configure network settings to fixed ip. Use Network => Edit Connections.
Copy setup files and wav fies onto usb.
After Ubuntu is installed, from terminal
$ sudo apt-get update && sudo apt-get upgrade && sudo reboot
$ sudo apt-get install ntp
$ sudo gedit /etc/ntp.conf
Look for this section and add last 2 lines
# By default, exchange time with everybody, but don't allow configuration.
restrict -4 default kod notrap nomodify nopeer noquery
restrict -6 default kod notrap nomodify nopeer noquery
restrict -4 127.0.0.1
restrict -6 ::1
Save and restart with
$ sudo /etc/init.d/ntp restart
$ sudo adduser asteriskpbx
# use password of asteriskpbx
$ sudo addgroup asterisk
$ sudo adduser asteriskpbx asterisk
$ sudo mkdir /home/asteriskpbx/asterisk
$ sudo chown -R asteriskpbx:asterisk /home/asteriskpbx/asterisk/
$ sudo mkdir /home/asteriskpbx/patriotwav
$ sudo chown -R asteriskpbx:asterisk /home/asteriskpbx/patriotwav/
Install Samba
$ sudo apt-get install samba
$ sudo smbpasswd -a asteriskpbx
# use a password of asteriskpbx
sudo gedit /etc/samba/smb.conf
#add this to bottom
[asterisk]
path = /home/asteriskpbx/asterisk
available = yes
valid users = asteriskpbx
read only = no
browsable = yes
public = yes
writable = yes
Restart samba with
$ sudo restart smbd
Get IP address of PC where ubuntu installed by clicking on network icon -> connection information. On Windows PC navigate to folder \\[ip address]\asterisk. This is the shared folder between Ubuntu and Windows network. Login with asteriskpbx/asteriskpbx. Tick remember credentials.
Copy files from \\PATOFFICE01\Documents\Technical\Telephony\Asterisk\setup files\ into \\[ip address]\asterisk
Alternative ways to copy files between Windows and Ubuntu
1. With WinSCP
The easiest way to transfer files between Windows and Ubuntu is to use WinSCP which can be downloaded from http://winscp.net/eng/download.php
2. With PSCP form your local PC to client's PC running ubuntu
Download PSCP from http://www.chiark.greenend.org.uk/~sgtatham/putty/download.html
Open command line prompt in windows.
Add folder path where putty resides to PATH. This setting last only till this command line window opened.
E.g.: set PATH="C:\Program Files\Putty";%PATH%
Copy from windows to ubuntu:
E.g.: pscp c:\Temp\test.txt asteriskpbx@192.168.2.81:/etc/asterisk/text.txt
Copy from ubuntu to windows:
E.g.: pscp asteriskpbx@192.168.2.81:/etc/asterisk/text.txt c:\Temp\test.txt
More documentation available here: http://the.earth.li/~sgtatham/putty/0.62/htmldoc/Chapter5.html#pscp
Note: If any FXS/FXO card is used which requires DAHDI driver, LibPRI and DAHDI need to be installed before installing Astersik. See instructions on http://www.asteriskdocs.org/en/3rd_Edition/asterisk-book-html-chunk/installing_how_to_install_it.html#Installing_id292785. Don't use PSTN lines (with SPA 3102 or FXO card) for outbound as no proper answer detection provided, use SIP trunking for outbound calls instead.
$ sudo chmod 700 asterisksetup.sh
$ sudo chmod 700 asterisksetup2.sh
$ run ~/asterisksetup.sh
Skip over Asterisk Module Select by pressing key x or press h for more info
$ run ~/asterisksetup2.sh
The install is now complete.
Reboot and logon as asteriskpbx. Test asterisk is running by typing,
$ asterisk –rvvv
The folder /home/asteriskpbx/asterisk or \\[ip address]\asterisk in Windows stores data like wav files used in dialplans or recordings . All changes to configuration files (*.conf) described below refer to files residing in /etc/asterisk/.
Check extensions.conf has extensions 110 and 111 configured to dial SIP phones.
E.g.
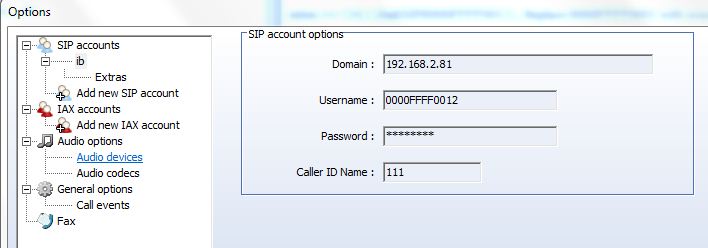
exten => 110,1,Dial(SIP/0000FFFF0011) ; Replace 0000FFFF0001 with your device name
exten => 111,1,Dial(SIP/0000FFFF0012) ; Replace 0000FFFF0002 with your device name
Setup soft phones for these extensions 110 and 111 using Zoiper, e.g.
Setup SIP
Password as secret in context [office-phone] in /etc/asterisk/sip.conf
Login to asterisk (asterisk -rvvv). Then make a call from extension 110 to 111. You should see log of call in asterisk.
Edit extension.conf
In [globals] section, set AGISERVER to IP address PC running V6 telephony task. If another AGI port than default port 4573 is used in telephony task, agi port needs to be set as well. E.g. AGISERVER => 192.168.2.80:2627
Set WINDOWSRECORDPATH by changing IP address to IP of asteriskpbx.
Edit "manager.conf" (note if "manger_custom.conf" exists in /etc/asterisk or is referenced by "manager.conf" edit this file instead)
Scroll down to section [asteriskpbx]. Change default secret to new password. Change permit to the IP address of the Patriot server (or the Patriot machine running the telephony task).
If the section starting [asteriskpbx] does not exist, create one. It should look like this when complete:
[asteriskpbx]
secret=<password>
deny=0.0.0.0/0.0.0.0
permit=<Patriot Server IP>/255.255.255.0
read=system, call,log,verbose,command,agent,user
write=system,call,log,verbose,command,agent,user,originate
.
.
.
Finally you need to restart the Asterisk PBX in your usual way, or manually with:
$ asterisk -rvvv
core restart now
Setup telephony task as per Telephony Module, and test task running correctly.
Finally configure the inbound and outbound dialplan conf files, and copy required wav files into home/asteriskpbx/patriotwav/
Varies depending on what dialplans are required.
Suggest that you test inbound dialplans using internal extensions before proceeding.
Available dialplans can be found in \\PATOFFICE01\Technical\Telephony\Call chains
Generally you will need to configure the sip trunk provider (with someone like 2talk), you will need to configure the inbound and outbound extensions used, and setup the dialplans for inbound and outbound extensions as required.
When all configuration is complete, log back into asterisk with ‘asterisk –rvvv’ and issue command 'core restart now'.
Used wavepad to convert formats, http://www.nch.com.au/wavepad/index.html
Asterisk can't seem to playback wav (might work if recored at 8khz, but haven't confirmed this)
Used gsm format, 8khz. Wavepad can convert sample rate (Edit => Convert Sample Rate), and save as various formats.
1. Login as sudo user.
2. In terminal navigate to source folder of user used for installaton. (e.g. $ cd /home/ingo/src/asterisk-complete/asterisk/1.8/)
3. $ sudo make uninstall
The following contains details on the steps run in the scripts used above. You should only need to refer to this if something has gone wrong while following the instructions above.
Setup Asterisk User
Sudo adduser –d /home/asteriskpbx –m asteriskpbx
Sudo passwd asteriskpbx
Sudo addgroup asterisk
Sudo adduser asteriskpbx asterisk
Sudo mkdir /home/asteriskpbx/asterisk
Sudo chown –R asteriskpbx:asteriskpbx /home/asteriskpbx/asterisk/
Setup Share on Folder
This creates a public folder to store wav files that is accessable from windows.
See windows sharing – samba4.doc
Install Asterisk
2.Synchronize time and install the NTP (Network Time Protocol) daemon:
$ sudo apt-get install ntp
The default on Ubuntu is to run a time sync server without ever changing the time on
your own machine. This won’t work for our needs, so we’ll need to change the
configuration file slightly. Because of this, we need to guide you through using a com-
mand line editor. The nano editor is already installed on your Ubuntu machine and is
remarkably easy to use†:
$ sudo nano /etc/ntp.conf
Your terminal will switch to full-screen output.
Use your arrow keys to move down to the section that looks like
# By default, exchange time with everybody, but don't allow configuration.
restrict -4 default kod notrap nomodify nopeer noquery
restrict -6 default kod notrap nomodify nopeer noquery
Add two new lines after this section, to allow ntpd to synchronize your time with the
outside world, such that the above section now looks like
# By default, exchange time with everybody, but don't allow configuration.
restrict -4 default kod notrap nomodify nopeer noquery
restrict -6 default kod notrap nomodify nopeer noquery
restrict -4 127.0.0.1
restrict -6 ::1
That’s everything we need to change, so exit the editor by pressing Ctrl+X. When
prompted whether to save the modifications, press Y; nano will additionally ask you
for the filename. Just hit Enter to confirm the default /etc/ntp.conf.
Now restart the NTP daemon:
$ sudo /etc/init.d/ntp restart
4. Install software dependencies:
$ sudo apt-get install build-essential subversion \
libncurses5-dev libssl-dev libxml2-dev vim-nox
5.Create your directory structure:
$ mkdir -p ~/src/asterisk-complete/asterisk
$ cd ~/src/asterisk-complete/asterisk
6.Get the latest source code via Subversion:
$ svn co http://svn.asterisk.org/svn/asterisk/branches/1.8
Or alternatively, you could check out a specific tag:
$ svn co http://svn.asterisk.org/svn/asterisk/tags/1.8.1
7.Build and install the software:
$ cd ~/src/asterisk-complete/asterisk/1.8/
$ ./configure
$ make
$ sudo make install
$ sudo make config
8. Install additional sound prompts from menuselect:
$ cd ~/src/asterisk-complete/asterisk/1.8/
$ make menuselect
$ sudo make install
9.Modify the file permissions of the directories Asterisk was installed to:
$ sudo chown -R [asterisk username]:[asterisk username] /usr/lib/asterisk/
$ sudo chown -R [asterisk username]:[asterisk username] /var/lib/asterisk/
$ sudo chown -R [asterisk username]:[asterisk username] /var/spool/asterisk/
$ sudo chown -R [asterisk username]:[asterisk username] /var/log/asterisk/
$ sudo chown -R [asterisk username]:[asterisk username] /var/run/asterisk/
$ sudo chown [asterisk username]:[asterisk username] /usr/sbin/asterisk
11.Create the /etc/asterisk/ directory and copy the indications.conf sample file into it:
$ sudo mkdir -p /etc/asterisk
$ sudo chown asteriskpbx:asteriskpbx /etc/asterisk
$ cd /etc/asterisk/
$ cp ~/src/asterisk-complete/asterisk/1.8/configs/indications.conf.sample \
./indications.conf
12.Copy the sample asterisk.conf file into /etc/asterisk and change runuser and run
group to have values of asteriskpbx:
$ cp ~/src/asterisk-complete/asterisk/1.8/configs/asterisk.conf.sample \
/etc/asterisk/asterisk.conf
$ vim /etc/asterisk/asterisk.conf
See “indications.conf and asterisk.conf” on page 53 for more information.
13.Create the modules.conf file. Enable loading of modules automatically, and disable
extra modules:
$ cat >> /etc/asterisk/modules.conf
; The modules.conf file, used to define which modules Asterisk should load (or
; not load).
;
[modules]
autoload=yes
; Resource modules currently not needed
noload => res_speech.so
noload => res_phoneprov.so
noload => res_ael_share.so
noload => res_clialiases.so
noload => res_adsi.so
; PBX modules currently not needed
noload => pbx_ael.so
noload => pbx_dundi.so
; Channel modules currently not needed
noload => chan_oss.so
noload => chan_mgcp.so
noload => chan_skinny.so
noload => chan_phone.so
noload => chan_agent.so
noload => chan_unistim.so
noload => chan_alsa.so
; Application modules currently not needed
noload => app_nbscat.so
noload => app_amd.so
noload => app_minivm.so
noload => app_zapateller.so
noload => app_ices.so
noload => app_sendtext.so
noload => app_speech_utils.so
noload => app_mp3.so
noload => app_flash.so
noload => app_getcpeid.so
noload => app_setcallerid.so
noload => app_adsiprog.so
noload => app_forkcdr.so
noload => app_sms.so
noload => app_morsecode.so
noload => app_followme.so
noload => app_url.so
noload => app_alarmreceiver.so
noload => app_disa.so
noload => app_dahdiras.so
noload => app_senddtmf.so
noload => app_sayunixtime.so
noload => app_test.so
noload => app_externalivr.so
noload => app_image.so
noload => app_dictate.so
noload => app_festival.so
Ctrl+D
14.Configure musiconhold.conf:
$ cat >> musiconhold.conf
; musiconhold.conf
[default]
mode=files
directory=moh
Ctrl+D
15.Save your changes and your module configuration is done. Your system is ready
to configure your dialplan and channels.
Might need to rebott to start asterisk service.
Copied in extsions.conf, sip.conf, and used dialplans.
Copied in manger.conf