The signals window updates whenever new signals are received.
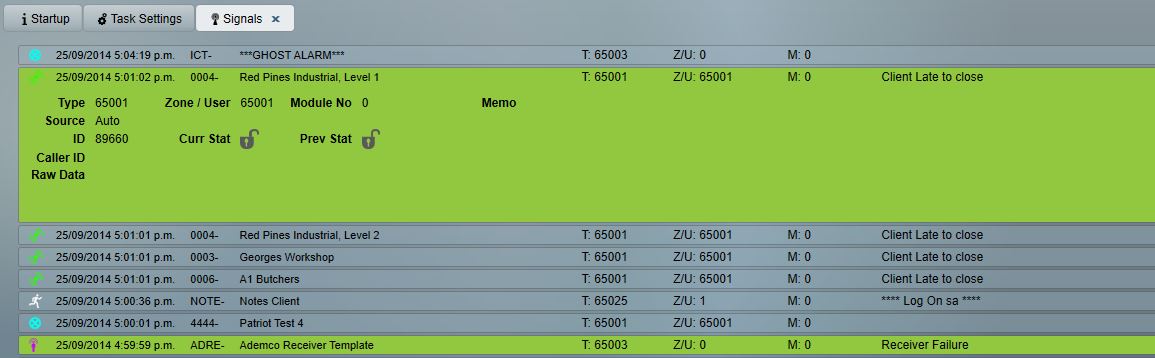
The Signals window enables you to quickly browse all the signals received. You are able to quickly move through the signals or jump to a related window. Alarm signals are highlighted in color depending on priority. See Action Plans for more information.
The signals window shows:
For any signal received, you can quickly view the client record by double clicking the related signal. The client record will show detailed information about the clients' address, panel, open/close times, signal types, users, dispatch details and other useful client information.
In the bottom left of of the Signals menu there is an array of options allowing you to control how you view the client signal history.

|
|
Auto Refreshing toggle |
The Auto Refreshing toggle is intended to assist signal selection during busy periods when, if a scroll occurs as the operator is about to select a signal (e.g. for viewing of a client record the wrong signal may be inadvertently selected. When Auto Refreshing is turned on the icon will have a green light (shown), when turned off i.e. screen will not scroll, the light will change to red. |
Requires 'Insert Manual Signal' operator security permissions.

|
Add Manual Signal |
The Insert button enables the operator to manually enter a signal. Normally this is only done for testing or troubleshooting purposes. |

Fill out each field. Client ID, Area, and Port ID all need to match up with the client account you are trying to add a manual signal for.

|
Click the save button to generate the signal. |
Note: If the client has an interpreter set (Advanced page of the client), the type and zone number entered here will be altered by the interpreter.
E.g. If a client file has the Signal interpreter set to one of the 4X2 formats, the signal will be interpreted as a binary number (a byte).

|
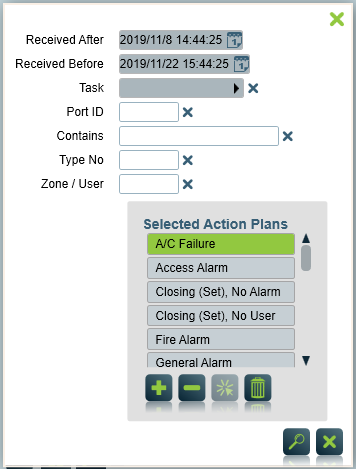
Search Signals |
The Search Signals button allows the operator to search the active list of signals for specific information. This is useful when you need to find specific signals in the recent history, such as if you have received a signal from a specific task while testing if it is connected. |
 
|
View Modes |
The two View Mode buttons allow you to switch between showing all of the information of a signal and showing a more basic faster view that only includes the Time Received, Client No, Client Name, Description of the signal, Type No, Source, ID, and Operator (if it is an Operator Note) |
Choose whether to show operator notes in the signal list.
