
This tutorial is designed to give you an understanding of Patriot Client Maintenance. It is assumed that users undertaking this tutorial are already familiar with the Windows environment and have completed the Basic Monitoring tutorial. This tutorial is intended for daily users of Patriot 6 (that is, monitoring operators), who maintain client data as part of their job. It should take approximately 30 minutes to complete. This tutorial will take you through the following steps:
Note: For the purposes of the tutorial some fields are left blank.
1. Adding a Client
2. Contact Tab
3. Event Types Tab
4. Zones Tab
5. Users Tab
6. Response Tab
7. Maintenance Tab
8. Billing Tab
9. Testing
To add a new client record, click the Search Clients menu item then the Add Client button on the Search Clients pop-up.
Adding a new client
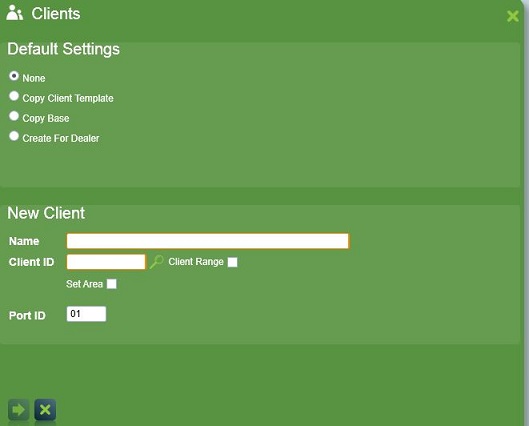
The New Client window will appear.
Note: Entry boxes with an orange border must be completed before continuing.
On the Add Client window enter the following details:
Default Settings: None
Name: ABC Factory
Client ID: 1077 (An alpha numeric client ID - must correlate to alarm panel. This can be alphanumeric characters, up to 16 characters long.)
Client Range: No, we want to add a single new client only
Set Area: No, we want to create a stand-alone client not a new area account for a partitioned client
Port ID: 01
 Click the
Next button at the bottom left of the screen.
This will create the new client. The main client window and tabs will appear.
Click the
Next button at the bottom left of the screen.
This will create the new client. The main client window and tabs will appear.
The Contact tab appears by default when you select a client. Pressing the Tab key will move you from one field to another. The Fields below are included.
In the Address area enter the following details:
Location: Corner of Light Street and Blueberry Road
City: Detroit
Zip/Post Code: 48205
State/County: Michigan
Country: United States
Site Phone: 5553214 (no spaces if the auto dialler function is to be used)
Mobile Phone: 025231684
Pager Number: 265380
Fax: 5553215
Email: info@abc_factory.com
Site Password: OK password indicates everything is normal at the premises; Hold up password used if the premises is under threat.
Keys: Indicate if keys to the site are held by the monitoring company.Key information is specific to the site. Select the panel interface at the site.
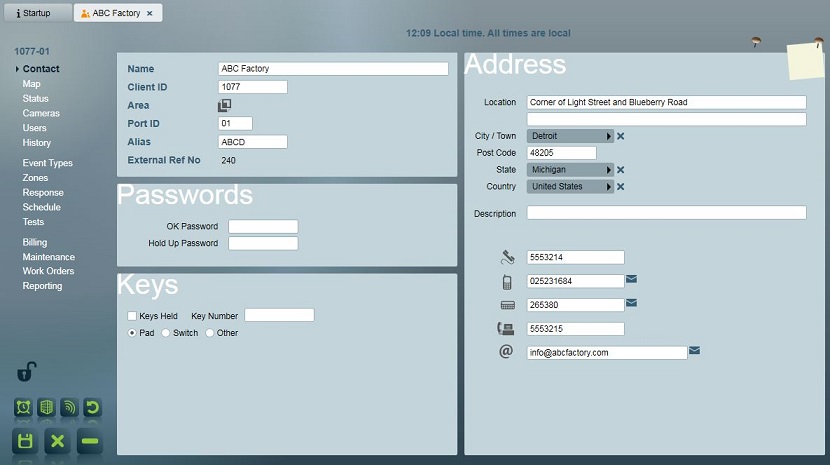
Client Contact Tab
 Click the
save button at the bottom left of the window to save your changes to the client
database.
Click the
save button at the bottom left of the window to save your changes to the client
database.
Now navigate to the Event Types tab.
The Event Types Tab shows the alarm types that have been set up for the client, together with a description (such as burglary, unset, set), and action plan which determines how Patriot deals with the event. Usually client Event Types are set up using Event Type Templates.
Check the Use Template Box. Click the Template Selector which displays the Template PopUp and double click the CID1-01 Template . This is the standard Contact (Point) ID template. It has been set up to be the default when inserting a new client.
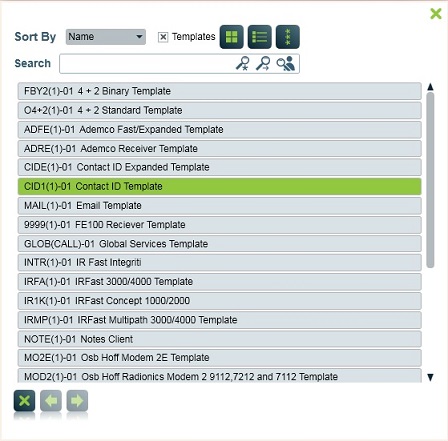
Using templates enables client Event types to be assigned quickly and easily.
The Contact ID template signal types will be displayed in the Types area with a grey template icon indicating that they are derived from a template or another Client record. A black client icon indicates an event type that is not derived from template but is instead specific to the client. A plain text description of each signal event type is included.
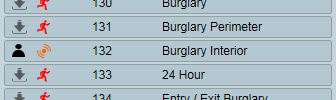
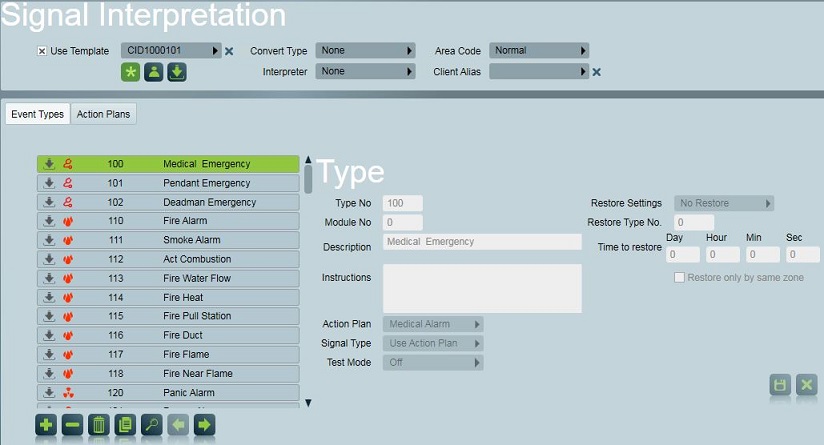
Event types list
 Additional
event types specific to this client site can be manually entered using the Add
button at the bottom of the Types list.
Additional
event types specific to this client site can be manually entered using the Add
button at the bottom of the Types list.
Types entered here which are also in the selected template will override that particular event type in the template. This means you can fine tune template event types to cater for minor anomalies at individual sites. New templates can be easily added to the system.
For a typical client Patriot will use the Template for the great majority or all event types.
Now navigate to the Zones Tab
Click the Add
button in the Zones area of the Zones Tab to insert a new Zone for the client.
The form below will appear.
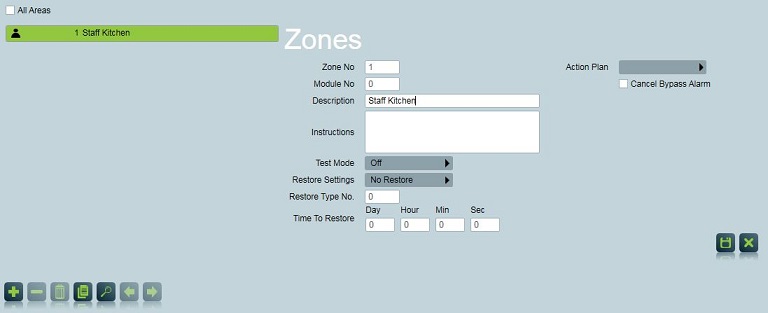
Adding a new Zone
Add two zone records as follows:
Zone No: 1
Module No: 0
Description: Staff kitchen
Click the
save button at the bottom right of the form to
add the zone to the list.
Click the Add button again to add another.
Zone No: 2
Module No: 0
Description: Main office
Click the save button at the bottom right of the form again to add the zone to the list.
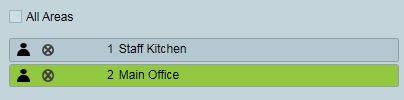
New Zones added
Now navigate to the Users Tab
In Patriot, 'Users' is an all-encompassing term meaning any person or organisation that may use a client system or be called upon to respond to an alarm from a client site. This includes daily users of the system, installers (and technicians) and global callout services such as Security Patrols, Police, Ambulance and Fire services. With Patriot 6, User details are only entered into the system once but a single user can be assigned to many different client sites. This ensures changes to User details (e.g. phone number or email address) only need to be updated in one place and will automatically appear where ever that user appears throughout the database.
We will assign a user to the site, add two user records for this client site and check global services for this client are correctly set up.
 Click the
Assign Users button at the bottom of the User
Area to display the Browse Users screen
Click the
Assign Users button at the bottom of the User
Area to display the Browse Users screen

Browse Users Screen
 Select Chris Smith from the list and click the Complete button at the bottom of the list. The User
will appear in the User area list for the client.
Select Chris Smith from the list and click the Complete button at the bottom of the list. The User
will appear in the User area list for the client.
Click on the
Add button in the User Area to insert a new user.
A new list entry will appear. This will be empty and an empty form will be
displayed to the right of the list.
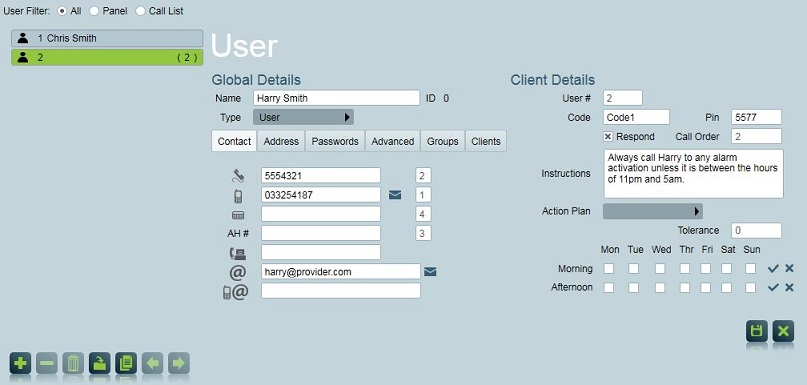
In the Global Details area, enter the following details:
Name: Harry Smith
Type: User
Phone No: 5554321
Mobile No: 033254187
Email: harry@provider.com
Location: Detroit State: Michigan (on the address tab)
In the Client Details area, enter the following details:
This is the new user’s information that is specific to the client site that the user is being assigned to.
User #: 2
Code: Code1
Respond: Yes, Call Order: 2
Pin: 5577
Instructions: Always call Harry to any alarm activation unless it is between the hours of 11pm and 5am.
Click the
save button at the bottom right of the User Area
to save the new User.
To add another user click the Add button again. The new user’s details are as follows:
Name: Steve Jones
Phone No: 5556789
Mobile No: 021483577
User #: 3
Code: Bones
Respond: Yes, Call Order: 3
Pin: 8877
Instructions: Always call Steve if an activation occurs between the hours of 11pm and 5am
Click the save button at the bottom right of the User Area to save the new User.
New Users Added
Note: The User number can (and should) coincide with the user numbers programmed into the alarm panel. User number lists will normally be obtained from installers. If user numbers are setup correctly in the alarm panel and in Patriot, then Patriot is able to keep a log of which Users Open and Close a Client Site. This log history is a useful management tool that may be requested by Clients.
There may be cases where a person is to be on the response list for a particular site but they are not programmed as a numbered user in the alarm panel. In these cases simply give the User a high User number outside the range of valid alarm panel users (e.g. user numbers from 10,000 upwards). Up to 65,000 Users can be entered for each site.
Code and Pin are descriptive fields. The Code field is used to record User Voice Codes and the Pin field is used by central stations to record the Users Panel Keypad number for opening and closing the system.
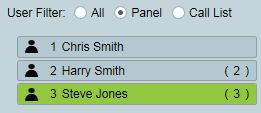
As well as adding individual users to a site, users can also be selected from any number of Global Templates. These can be created to address different customer groupings. Customers in one city might use a different Global Template and Users to those in another city. For this tutorial, we are using the default Global Services Template (Glob) and the users from this template will be available for inclusion on the ABC Factory site.
1. Ensure the Global Users check box is on in the Users Area. Global Users can include emergency services, security patrols etc.
2. Ensure that one of the three User Templates is set to the default Global Services Template
We'll use User Template 2 for global services. Click the User Template 2 selector and then locate and select the Global Services Template (this the the default template for emergency services, and others which are applicable to all clients).

Importing Global Users from templates
Now navigate to the Response Tab.
Just as the Action Plan determines how Patriot will categorise an alarm signal, the response plan sets up the response process for the different types of activations. The response plan may require operator attention or might initiate an automated response such as Text Messaging or Email. Response plans can be configured at the global action plan level, at the dealer level, and at the client level. Recommended practice is to begin assigning response plans at the top level (action plan) and then work your way down to the dealer and then client level in cases where further customisation is required.
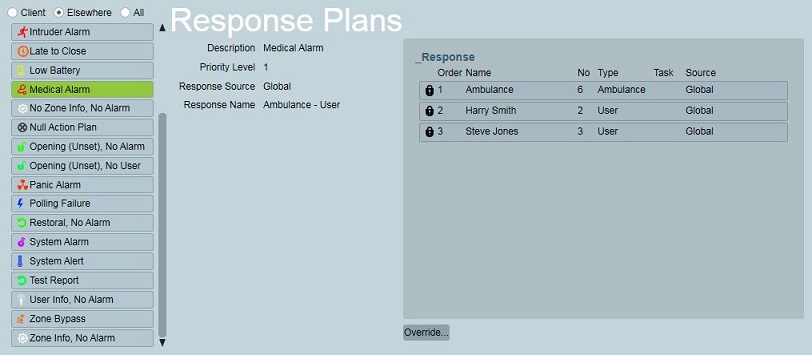
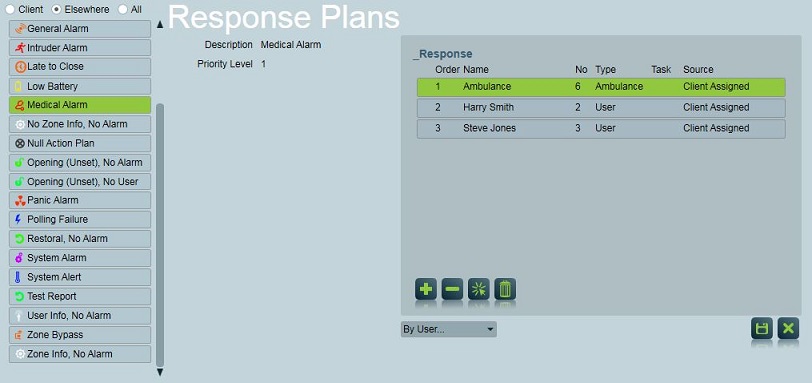
The default global response plan for the 'Medical Alarm' action plan is called 'Ambulance - User'.
Typed Response Plans
This response plan includes all site users of type 'Ambulance' and type 'User' in that order. We will now override this global action plan response at the client level.
First switch the client response plan filter from 'Client' to 'Elsewhere' so that action plans with global and dealer level response plans are displayed. Now in the list on the left of the Response tab, select the 'Medical Alarm' action plan.
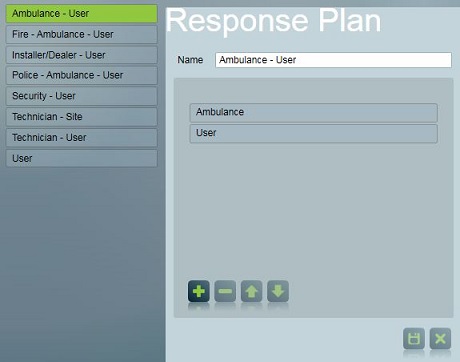
Below the grey Response Plan area, click Override...

The default response plan override option is 'By Type...' this is the quickest method of overriding a response plan, and the method we will cover first in this tutorial. Click on the response plan selector to choose a replacement response plan for 'Medical Alarm' at the ABC Factory site.
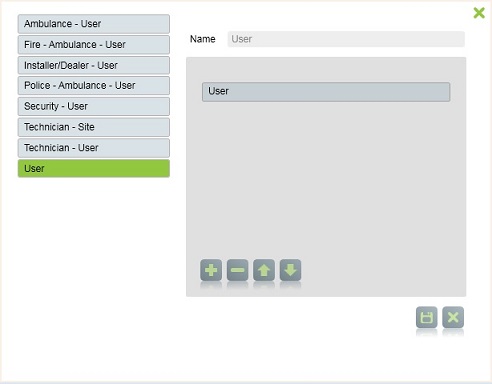
Double click on the 'User' response plan to select it as the new response plan for 'Medical Alarm'
Click the
Save button at the bottom right of the window to save all changes made to the
Response Plans area. (Click Cancel to cancel all changes made)
Note that the overridden response plan for 'Medical Alarm' now appears when 'Client' filter is turned on because 'Medical Alarm' now has a response assigned at the client level.

Typed response plan assigned at the client level
Next we will remove the 'Medical Alarm' response plan 'By Type' override and replace it with a 'By User' override. To remove a 'By Type' response plan override simple click the remove button beside the response plan selector, then click save to remove the override.
Now, once again, switch the client response plan filter from 'Client' to 'Elsewhere' so that action plans with global and dealer level response plans are displayed. Next select the 'Medical Alarm' action plan, and once again click Override... but this time switch the override selector from 'By Type...' to 'By User...'
Manually override a response plan By User
Overriding a response plan by user allows you to manually pick and choose the site users who will form the response plan. This method is best suited to 'one off' response plans where it does not make sense to create a standard standard typed response plan (which can be re-used across multiple clients).
Earlier when we added Harry Smith to ABC factory we set up a default dispatch instruction. You can view or change this dispatch instruction by double clicking on the user in the overridden Response Plan list to display the edit dispatch instructions Pop Up. This Pop Up also lets you change the call order of this User on this response plan if required, but lets just keep things as they are.
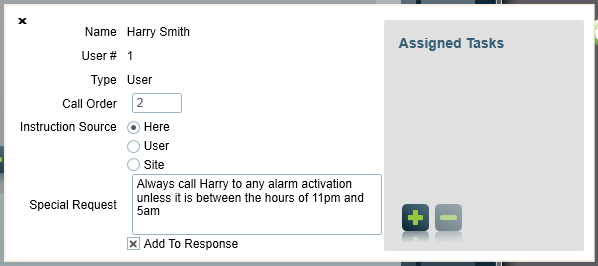
Dispatch Instructions
We have left the default call order of each User (retrieved from the user record). By clicking on any assigned User we can change the call order or dispatch instructions for this particular Response Plan. This will not alter the default instructions or default call order for the User. This is updated in the actual User record.
Note: If additional optional modules such as Text Messaging or e-mail are configured, these can be included in the response plan in the Assigned Tasks zone of the despatch instructions popup.
Click the
Save button at the bottom right of the window to save all changes made to the
Response Plans area
(Click Cancel to cancel all changes made)
Now navigate to the Maintenance Tab
The Maintenance Tab is where Panel and servicing information is entered.
Enter the following details:
Installed: 16/12/15 (Installation date. Don’t enter the slashes, as these will be populated automatically when you move away from this field).
Warranty (Months): 12 (Number of Months warranty for alarm installation)
Now navigate to the Billing Tab
The Billing Tab shows all charges assigned to the selected client. A postal address can be added for billing.
Enter the following details:
Account number: 1077(Accounting Reference Number). This will usually be the customer code in the Monitoring Stations Accounting software and is used by the optional Accounting Module.
Click the large Save button bottom left of the client window
to Save all additions we have made to the record.
We will now enter signals to test the results. Manual entry of signals is a useful test tool. It can easily be disabled from: Security Menu Item -> Security Groups once Patriot goes live. Manual signals are also flagged with “Manual” as the source parameter so they are easily distinguished.
Go to Signals Menu Item -> Signals to display the Signal
Window and then click the Add Signal button from the bottom of this window to
enter a signal.

Manual signal entry Pop Up
Enter the following:
Client ID: 1077
Type No: 401
Zone User: 1
Click save to return to the Signal screen.

ABC Factory Opening Signal
The signal you have entered should now appear as the top most line on the Signals window list. The signal we entered was of Opening type in the Contact ID template we have chosen for ABC Factory. Patriot will attach the User name to the Event Type description (Open By) because we set Popup Smith with panel user no. 1 on the Users Tab . The signal will also have altered the site status from Closed to Open as shown by the Current Status and Previous Status fields in the signal details.
Enter another signal.
Do the following:
Click on the Add Signal button at the bottom of the signal window.
Client ID: 1077
Type No: 121
Zone User: 2
Click save to return to the Signal screen.

ABC Factory Duress Alarm Main Office
This time we have entered an Alarm type signal so Patriot has attached a Zone description taken from the Event type description (Duress Alarm) from the Contact ID template. A flashing high priority 'Panic Alarm' icon will have been added to the right hand panel area.