Camera Type Selector
This document explains how to setup the cameras on a client in general terms. For interface specific details, please see the respective document on that particular interface.
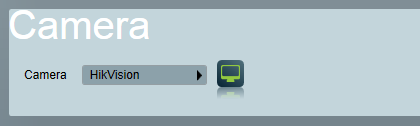
From the Zones tab of a client, set the Camera Type to the appropriate type. Only one type of camera interface can be used per client. Only the camera interfaces you have been licensed for will be displayed.
If the cameras are supported through a DVR or NVR (hardware or software), where all control of the cameras is directed through this one device (or software application), then Patriot will generally allow the settings for the DVR/NVR to be entered into the Camera area. These settings will only appear once the camera type has been selected. Refer to DVR monitoring for further information.
Once the correct camera type has been selected, you can configure individual cameras. In most cases individual cameras are configured in Patriot as separate zones. The settings for each camera are dependency on the camera type selected. See the specific camera type document for more details.
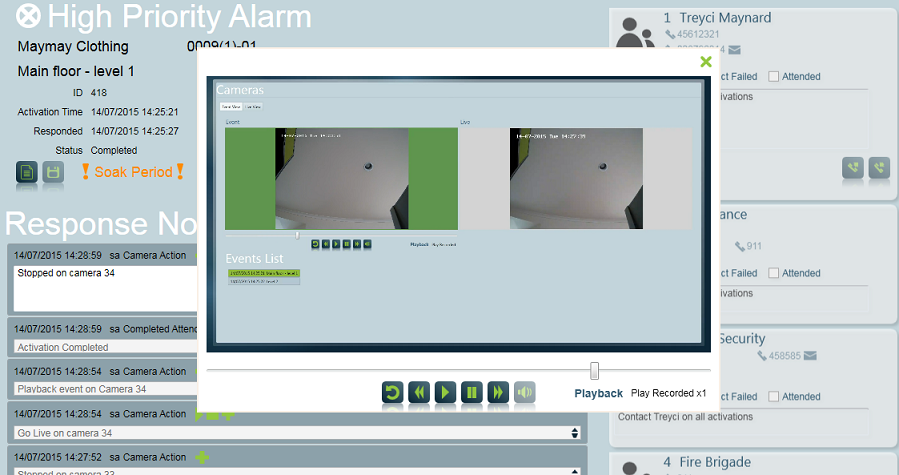
Patriot can be configured to record the contents of the camera monitor window each time an operator responds to a camera enabled activation. After the activation is completed, the video recording can be reviewed from the client activation history tab or the completed activations maintenance menu item (Playback Camera Actions security rights required to playback recordings). Because the entire camera monitor window is recorded (mouse cursor included when applicable), by reviewing a camera action clip you can see exactly what an operator saw in the camera viewport(s) during the course of an activation response, and what camera actions were taken.
The Video Recording client files installed into the Patriot client installation folder* of each workstation used to respond to camera enabled activations. Contact Patriot Support for a copy of these files.
* This is normally: C:\Program Files\Patriot Systems\Patriot Client\
Patriot saves operator camera action recordings to .avi video (H.264 codec) files in a directory referenced from your Patriot server. The length, quality, and storage location of these recordings can be configured under system wide miscellaneous settings. You can also optionally specify an archive directory where Patriot can automatically transfer old recordings.
Camera action recordings vary greatly in file size depending on your monitor resolution and the system wide recording quality setting; if medium quality is selected you can expect a one minute long recording of a high definition monitor to use approximately 400 kB of disk space. To assist in managing server disk space, Patriot can be configured to automatically move video files older than a set number of months from the Video Storage Path to the Archived Video Storage Path. Refer to archiving for more information.
Guard Tours are pre-set lists of cameras that are to be viewed by an operator, at pre-set times. The operator is presented with the cameras in sequence (option to display several cameras at once). Each individual camera viewed is called a Camera Tour. The Guard Tour is presented to the operator as a standard activation. All events are recorded into the activation history. Recorded events include times each camera is viewed (start and finish), if the guard tour is paused, and when it is completed. Only certain camera types allow Guard Tours. See the individual camera type document for more information.
There is an Operator Security setting which defines if the operator is allowed to pause a Guard tour once it has begun. If the operator doesn't have this access right, they will be forced to view the entire Guard Tour from start to finish. The security setting is in Monitoring Menu -> Current Activations -> Pause Guard tour.
You can also define if an operator is able to complete the activation before the Guard tour has been completed. From System Settings -> System Wide Settings -> Activation Settings -> Activation Completion Rules, define the Guard Tour must be completed rule as required.
Once the camera type and individual cameras have been configured in Patriot, a Guard tour can be setup. Next to the Camera type selector, is the Guard Tour button. Press this to configure Guard Tours.
Press insert to create a new Guard Tour. Set the name, and select how many cameras will be displayed to the operator at once. Then add the cameras to be viewed in this tour. Insert will list all the cameras configured on this site. Once a camera has been added, you can double click on the camera to set additional settings.
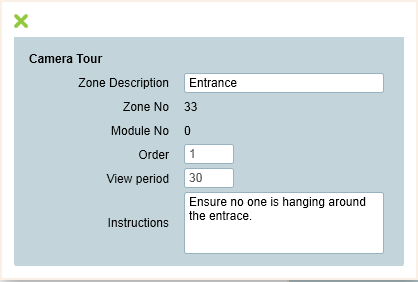
You can set the minimum seconds the camera must be viewed for. You can also enter instructions which will be displayed on this camera during a camera tour.
To schedule a Guard Tour, firstly you need to setup a Guard Tour client reminder.
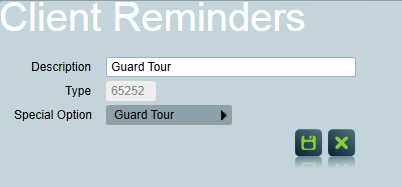
From Maintenance -> General -> Client Reminders, ensure at least once client reminder has been configured with its special option set to Guard Tour. The Type No used for this Guard Tour should be added to all event type templates which are going to be used from clients doing Guard tours. This should be given a priority action plan, so the event generates an activation.
Now from within the client, setup a client reminder,
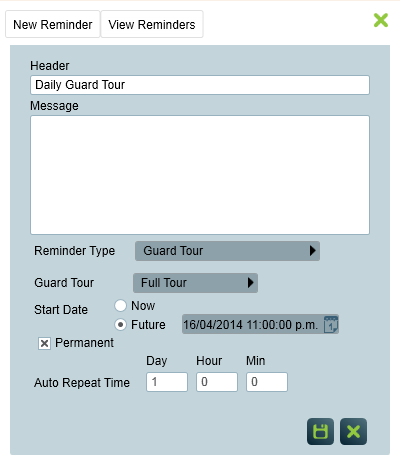
When you select a reminder (with special option of Guard Tour), the Guard Tour selector will appear, allowing you to select from Guard tours configured on this site.
When a Guard Tour activation triggers, the Guard Tour button will be displayed.

Pressing the Guard Tour button will begin the Guard Tour. It is displayed in a new window so nothing other than the Guard tour can be viewed by the operator.
Once started, the Guard Tour must be viewed until completion unless the operator is given the right to pause a guard tour. A pause button will be displayed to allow this. Closing the Guard Tour window also pauses the tour. The time the tour is paused is recorded in the activation history. To resume the Guard tour, the operator must press the Guard tour button from the Activation window again. This will start the tour from the last completed camera tour.
Each Camera tour configured is displayed in sequence to the operator. Controls for the camera are intentionally displayed to force the operator to view the camera.
If an operator sees something they wish to investigate further, they can press the play live button for that camera. If displaying in multi view, they need to ensure the camera they wish to view is selected first. With the live button pressed, all control of the camera is given to the operator. The stop button will only appear once the minimum camera tour time has been exceeded. The camera tour will continue on as long as the operator desires. The press the stop button to end this camera tour, and move onto the next camera.