 Add a new task
to the list in the Task Settings window. Double click on Telephony in the drop
down list in the details area of the window.
Add a new task
to the list in the Task Settings window. Double click on Telephony in the drop
down list in the details area of the window.If you are running the telephony module prior to version 6.1, or as the legacy task, see the telephony documentation in the Patriot 5 library.
The Patriot telephony module is a powerful tool that can be used to build an interactive automated telephony IVR (Interactive Voice Response) that interface the caller and the Patriot database.
The Patriot Telephony module works in two parts, the Patriot Telephony task, and an Asterisk PBX. The Asterisk PBX handles all the actual telephony functionality like call control, playback, recording etc. The Patriot Telephony task handles the interface with the Patriot database.
A Patriot support employee will install and configure the Asterisk PBX and appropriate IVR system. If you already have an Asterisk based IP PBX then this may be able to be used, but please discuss this with the Patriot support team first. Patriot's Telephony module is currently tested with the v1.8 LTS Asterisk release only. The setup and configuration are outside the scope of this document, but the following will help with general system maintenance.
A shared public folder will be setup on the Asterisk PBX which is normally accessed by \\[Asterisk PBX IP Address]\asterisk. This folder will be used to store any recorded messages.
The IVR dialplans are normally stored in \etc\asterisk\custom-dialplans and IVR dialog in \etc\asterisk\custom-dialog. The setup of Asterisk dialplans is complex and altering of the files should not be attempted unless you have experience with Asterisk dialplans.
To make calls beyond the Monitoring station you will need an account with a VOIP Provider. You should consult with Patriot staff before signing up to a contract, but basically you need the following,
Setup and configuration of this task requires registration of the telephony module.
System Menu Item→Tasks → Task Settings
Please read Task Settings for general information about adding tasks.
Add a new task
to the list in the Task Settings window. Double click on Telephony in the drop
down list in the details area of the window.

Click the next button to continue. The Telephony task settings form will appear.
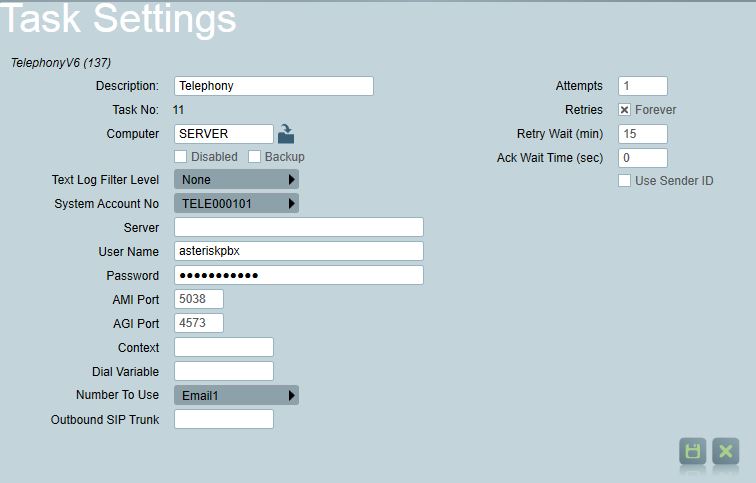 Telephony Task Settings.
Backup: Check this box if you wish this task to be defined as a backup task.
System Account No should be set to the task template account of the task.
Server Set to the IP address of the Asterisk PBX running the IVR.
Username and Password of the AMI manager in the Asterisk PBX. These will be set during the setup of the Asterisk PBX.
AMI Port Port used by the AMI Manager on the Asterisk PBX, the default is 5038.
AGI Port IP Port used on the machine running the telephony task that the Asterisk PBX talks to. This must be set to a free port on this machine. The default port is 4573.
Outbound SIP Trunk set this to the name of the SIP trunk configured in the Asterisk PBX.
Context is the default context that calls will be placed in. This can be used to control the dialplan that will be used. Note: This option was not always available, and previously used the fixed value of 'LocalSets'. If using dial plans created under older versions of Patriot, this value might need to be re-entered or the dialplans updated.
Dial Variable any variables that need to be passed to the dial plan can be entered here. Separate multiple variables with the | (pipe) character, e.g."VAR1=ABC|VAR2=25". This is not normally required.
Sender ID if a number is entered in this field Patriot will attempt to assign it to the caller ID field of each call made through the task. Not all VoIP providers will allow you to manually set caller ID, and those that do will require that the number you set is registered to your account if it it is to be passed on to the recipient.
Warning: older acknowledged Telephony call chains (supplied before Patriot v6.4 may require an update before you can enable Sender ID. Please contact Patriot Support if you are unsure.
Important: When the task first starts up, it will attempt to connect to the AMI manager on the Asterisk PBX. If the AMI Manager on the Asterisk PBX is not configured correctly or the Server, username, password is not set correctly in the task, this connection will fail, and the task will shutdown immediately on startup.
During the setup of the Asterisk PBX, the call chains will be setup. Each outbound call chain will be tied to a particular extension. For each outbound call chain used, the name and extension of the call chain needs to be setup in Patriot. These can then be assigned where appropriate in the response plans.
From the client, open Maintenance => General => Call Chains. Here you need to define a header for each outbound call chain.
Note: Inbound call chains don't need to be setup as they can't be assigned into a response plan. Inbound call chains are completely configured on the Asterisk PBX.
Make sure there is a record for each outbound call chain, with a good descriptive name, and with the Extension field set to the Extension this particular call chain is tied to in the Asterisk PBX.
The telephony task is an assignable task and can be assigned to a user in a response plan in exactly the same way as other assignable messaging tasks like GSM and Email.
Once the task assigned been assigned to a user in a response plan, double click on the assigned task to open the Telephony task assignments window. Set the Outbound Call Chain selector to the appropriate call chain to run when this task is triggered.
Call are by default external calls, ie they go through the SIP trunk defined in the task settings. You can call an internal extension by putting SIP/ in front of the phone number of the user to be called.