Tasks are communications that run in the background, allowing Patriot to communicate with other hardware or software such as Alarm Receivers, IP Panels, Digital Video Recorders, and email and SMS messaging systems. Tasks can be added or configured from the Task Settings Window.
System Menu Item→Tasks → Task Settings
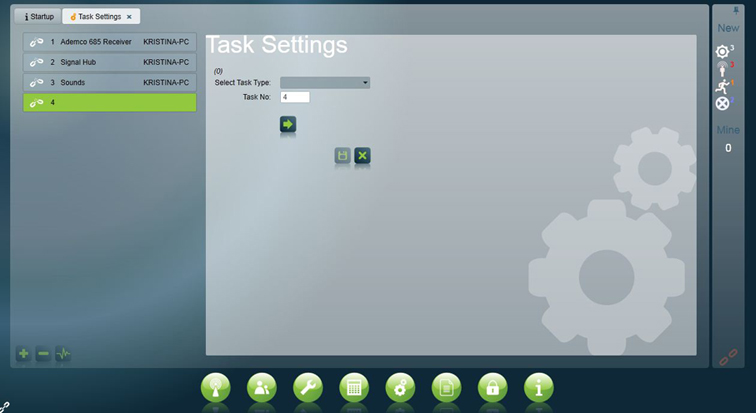
Adding a new Task from the Task Settings window.
The Tasks window displays a list of all the Tasks you currently have installed.
Many Tasks are freely available. Some Tasks require specific module registration. See the specific Task installation pages in this section for more details. If you require a task which is not included on your current licence, please email us at: Sales@patriotsystems.com
 Click the Add
button at the bottom of the list to add a new Task.
Click the Add
button at the bottom of the list to add a new Task.
Click on the Select Task Type box to display a list of Tasks.
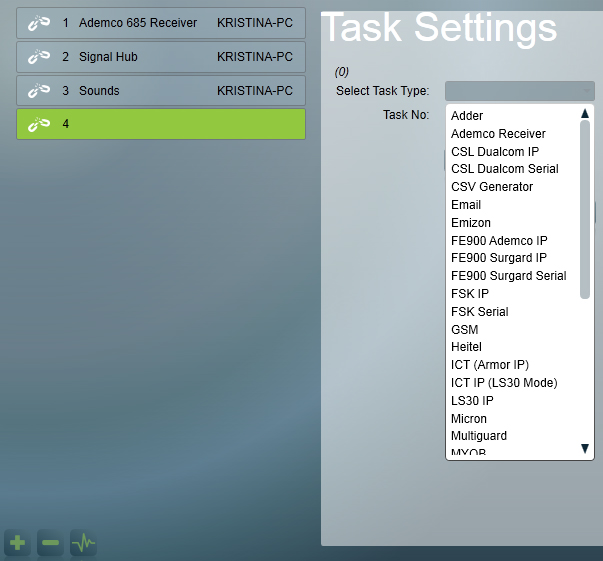
Selecting a Task Type.
 Select the Task
you require from the list and click Next.
Select the Task
you require from the list and click Next.
Fill in the task details and click Save when finished.
Note: Although not usually necessary, some tasks may require a restart of the client, data or task service to be fully enabled. In most cases this will be mentioned in the specific task setup documentation.
Legacy Tasks: If you are using any Patriot 5 tasks, these can only be edited from the Legacy Tasks window (System -> Tasks -> Legacy Tasks).
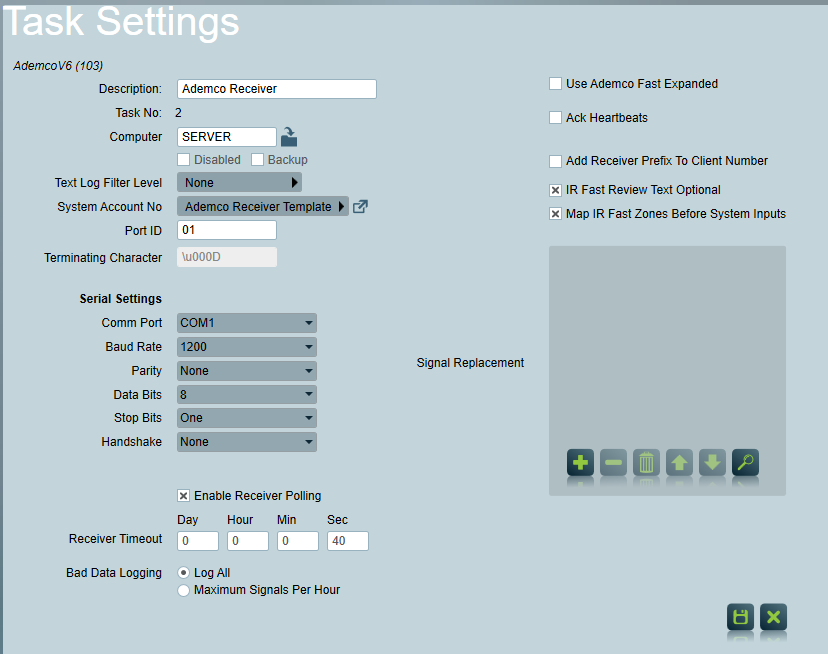 Task settings panel for the Ademco Receiver Task. Many settings are shared
between Patriot's various receiver tasks.
Task settings panel for the Ademco Receiver Task. Many settings are shared
between Patriot's various receiver tasks.
Enter a Description of the task.
Select the Computer that this task is to be run on. It will be defaulted to the name of this computer.
Backup: Check this box if you wish this task to be defined as a backup task. This will prevent the backup tasks showing in a faulted state when the primary task service is running.
Serial Settings:
Serial devices will need to be correctly configured so that information sent by the receiver or other device can be interpreted correctly.
These settings must match the settings on the receiver. If you are having trouble getting any communication from your receiver, it is normally caused by having one of these set incorrectly. With most receivers, the serial settings are configurable, so check your receiver to make sure these match exactly.
IP Settings:
There are 2 main kinds of tasks that communicate using TCP/IP:
Enter a System Account No. This is the account number which signals that apply directly to the receiver will be logged against (ie Low Battery, Line Card Failure). For the Ademco Receiver, use a System Account No of 9999000101.
Recording Raw Text. If you want to record raw text, enable the Log To Text File check box. This will cause raw text from the receiver to be written and stored in the text log. Normally this should be left off as it will slow the system down fractionally, but it is useful for trouble shooting purposes. Only one task at a time should have the Log To Text File check box enabled. Otherwise the text log will become mixed, making it difficult to determine which text log entries came from which task. Patriot 6 can use Text Logs to simulate your receiver, which is a very useful tool for investigating problems or new or unusual formats. Text Logs can be printed off and faxed to your distributor, but it is normally best to email the file, so the text log can be simulated for trouble shooting purposes. The Text Log can be found in the C:\Program Files (x86)\Patriot Systems\Patriot Task Service folder on the Patriot server.
Terminating String. The Terminating String for the Ademco Receiver should be set to <0D>. The Terminating String will normally default to the correct value. It is the hexadecimal ASCII value of the terminating character in a signal from the receiver. If necessary this can be changed to coincide with the attached receiver.
Strip Leading Characters. The Strip Leading Characters for the Ademco Receiver should be set to 0. This parameter can be used to remove unwanted leading characters from the raw data string produced by some receivers, such as a date and time string. Normally this parameter will be left as zero.
Disable Hardware Flow Control. The Disable Hardware Flow Control for the Ademco Receiver should be set to unchecked. This parameter allows RTS/CTS handshaking to be disabled, which may be required for some receivers or cabling configurations.
Use Ademco Fast Expanded Option. Generally this should be left unchecked. In some cases your software provider may ask you to change this when dealing with complex Ademco Fast clients.
Enable Receiver Polling. When enabled, the Receiver Timeout setting can be entered. If the task fails to receive a poll or regular signal from the connected device(s) within the Receiver Timeout setting, a Polling Failure (65021) signal will be logged.
Any signals received through this task will be logged against clients with this Port ID. It will normally be entered as two digits, for example: "01". Leave this as the default of "01" unless you are monitoring duplicate account codes on different receivers.
If you do have duplicate account codes on different receivers, change the port ID to a different value (say 02) to avoid any ambiguity.
It is also possible to use the Receiver line card number of a signal to determine what Port ID the signal is logged under. For more information see Line Card Mappings.
 Once you
have entered all the settings, save the Task. It will automatically start the
task up, unless the Disabled box is checked.
Once you
have entered all the settings, save the Task. It will automatically start the
task up, unless the Disabled box is checked.
 In the task settings screen, highlight the task you want to see the raw data
from and select the diagnostics button in the bottom left corner. This will
display all raw data sent from the receiver and received by the task. In most
cases you should at least see a poll from the receiver every 30 seconds, and
also see any valid signals received by the receiver.
In the task settings screen, highlight the task you want to see the raw data
from and select the diagnostics button in the bottom left corner. This will
display all raw data sent from the receiver and received by the task. In most
cases you should at least see a poll from the receiver every 30 seconds, and
also see any valid signals received by the receiver.
To ensure the safety of removing serial devices, first you should disable the task. (Check the "Disabled" box, and save the task.) Then under Computer Management in Windows, you should safely eject the device by right clicking on it and safely remove/eject. Ensure the serial port is properly closed down in Control Panel -> Device Manager. If the COM Port is still showing, you should manually disable it.
To reconnect the device:
Each workstation on the network must have a unique computer name set up in its registry. The Computer functioning as the patriot server and running the Data service should be set with a static I.P address on the network.
Note: All network workstations running the Patriot 6 software must have their clocks synchronized within two minutes of each other, as the program uses these times to determine that background tasks are alive and functioning correctly.
By default all Patriot tasks respond in the same way to an offline or unreachable Patriot Data Service or SQL Database but a selection of tasks also support one or two alternative offline behaviours.
The default behaviour is named the Cache offline behavior and it changes depending on whether it is the Patriot Data Service or the SQL database which is offline or unreachable.
The Cache offline behaviour:
The Patriot task will continue to acknowledge signals from the Alarm Receiver (or IP alarm panel, IP converter unit, DVR etc.).
If the Patriot Data Service is offline or unreachable: the task will first cache signals to local RAM on the Task Server and then periodically - every ten seconds - save the RAM cache to the local storage directory*.
If the Data Service is online but the SQL database is offline or unreachable: the task will transmit signals to the Data Service which will then cache the signals to local RAM on the Data Server and then periodically - every ten seconds - save the RAM cache to the local storage directory*.
* Usually the local disk, but can be changed in the Task or Data Service configuration - see High Availability.
Unlike the default Cache behaviour, the alternative offline behaviours described below do not change depending on whether it is the Patriot Data Service or the SQL database that is offline or unreachable.
The Disconnect offline behaviour:
The Patriot task will not acknowledge any signal from the Alarm Receiver (or IP alarm panel, IP converter unit, DVR etc.) and instead will immediately terminate the connection.
The NAK offline behaviour:
Patriot task will send a Not Acknowledged (NAK) reply to all signals received from the Alarm Receiver (or IP alarm panel, IP converter unit, DVR etc.). The NAK behaviour is generally preferred over the Disconnect behaviour which largely exists to support IP alarm panels which do not support NAK.
The Disconnect and NAK offline behaviours have the same key advantage over the default Cache behaviour: when the Patriot Data Service (and therefore the SQL database) is offline, the unacknowledged signals are cached on the remote end of the connection - and in cases where the remote end represents hundreds or thousands of independent and high reliability IP alarm panels, this can offer more fail safety than storing all signals in a single RAM cache or disk file on a local server.
The key advantage of the Cache offline behaviour over the alternative behaviours is performance - higher signal logging through puts are possible when using this offline behaviour because it means that Patriot's signal logging process is not limited to synchronous operation.
Due to the high bandwidth afforded by Patriot's IP receiver tasks there is potential for faulty alarms or malicious parties to flood an IP Server Receiver task with bad data which can lead to system lag. In addition to I.T. infrastructure level preventive measures, Patriot provides Bad Data Rate limiting options on all IP server receiver tasks.
By default rate limiting is set to Log All which means the Patriot task will log every bad data signal it receives. The bad data will be logged, depending on the Bad Data Logging system wide setting, to either the Windows Event Log or as a signal to the Task's selected System Account.
The alternative to the default Log All mode, is to set a Maximum Signals Per Hour. You can set this to zero to prevent the Patriot task from logging any bad data (not recommended as you may miss signals from valid but incorrectly configured alarm panels). Or you may set to a positive value (less than 1000) and Patriot will log no more than this limited number of bad data signals in any 1 hour period.

Patriot also provides a performance counter for monitoring the volume (including those suppressed by Patriot task rate limiting) of bad data signals received by a receiver task in real time.