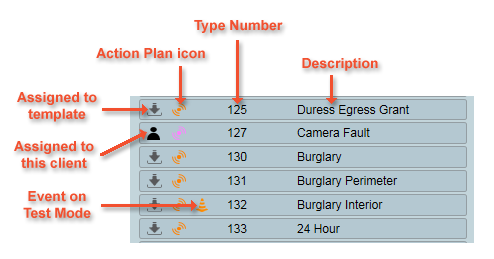
The list of Event Types shows how each Type Number will be interpreted.
Signals received in Patriot each have a Type Number. The Event Types tab is used to configure how a client will interpret these type numbers. To each Type number you can assign a description (such as burglary, unset, set), and an Action Plan which determines how Patriot deals with the event. You can configure custom event types for a single client, but it is more common to configure the event types in a template. This way it can be re-used for any clients that need the same event types.
Some examples of common event types are Burglary, Fire, AC failure, Low Battery, Closing and Opening signals. Types are shown in ascending numeric order. Buttons are provided for adding, deleting and copying event types.
 To add a new
type record, click the Insert button, and fill in the boxes to the right of the
list of Event Types. Once you have finished editing, click the Save button.
To add a new
type record, click the Insert button, and fill in the boxes to the right of the
list of Event Types. Once you have finished editing, click the Save button.
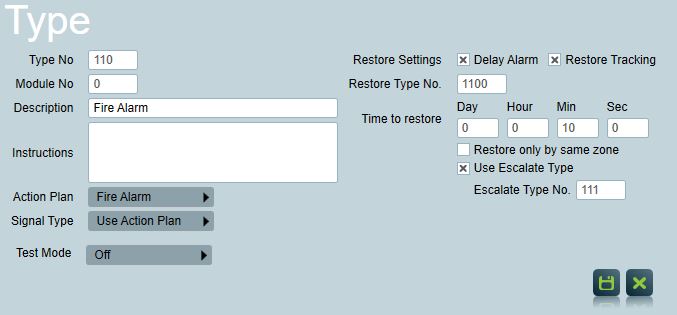
Fill in the following information and click the Save button:
| Type No | Types can be any number between 0 and 65,535. Types above 65,000 should normally be reserved for internally generated signals. Duplicate type numbers are not permitted and will cause a "Duplicate Key Error" to be displayed. (however, if using an alternative lookup overlapping signal type numbers can be inserted here to override at the client level.) Type descriptions can be set-up for internally generated type numbers if these are required. |
|---|---|
| Module No | Default value is zero. Changing this to a different number will override the module number from the signal. This is useful if you wish to use different zone lists for some event types. Each module number has its own separate list of zones. Further details about this can be found in the Contact ID page in the library. |
| Description | A description explaining the meaning of the type to the monitoring operator. |
| Instructions | Dispatch site event instructions for this event type. |
| Action Plan | The Action Plan associated with each signal type determines the nature of that signal when it is received. Each event type should have the appropriate action plan selected. See Action Plans for more information. |
| Signal Type | Enterprise Only. The signal type of the action plan selected by the type can be overridden here. This can be useful if you wish to change the signal type, but otherwise use an existing action plan. Select 'Use Action Plan' if you don't wish to override the default action plan behaviour. See Action Plans for more information on signal types. |
| Test Mode | Allows site to be placed on test, please refer to Test Mode section for more information. |
| Restore Settings | Allows Patriot to monitor restores for this action plan type, for more information see Automated Alarm Handling. |
Note: Only the first alarm of a given action plan is shown for each client. For example, if fire is given the same action plan as another life threatening situation (for example, an elderly person activating their pendant), only one type will appear in the Attend Screen (i.e. pending alarms). Therefore, if a fire occurs at the same time that the pendant is activated, the alarm that is activated first will appear. This will result in the other alarm (which, in our example, is the pendant) going unnoticed by the operator. To avoid this, make sure only alarms which should be grouped together are given the same action plan.
Signals received with a signal type (event) that have not previously been set-up in Patriot 6 will automatically alarm. Signal types that require no action, or have no effect on the system, should be given a 0 priority action plan to avoid unnecessary activations.
To change a type record, select the Event Type to change from the Event Types Tab and click the Edit button. This displays the Changing an Event Type window showing type details and the assigned action plan. Make any changes as necessary and click the Save button.
Note: Template or alternative lookup event types can only be changed within the actual template client.
 To
delete a type record, select the type to delete from the scrollable list in the
Types area of the Event Types Tab and click the Delete button. A message
appears asking if you are sure you want to delete the highlighted record. Click
Yes to confirm the deletion. Click No to cancel.
To
delete a type record, select the type to delete from the scrollable list in the
Types area of the Event Types Tab and click the Delete button. A message
appears asking if you are sure you want to delete the highlighted record. Click
Yes to confirm the deletion. Click No to cancel.
 Instead of
repetitively inserting new types you can copy all the types from an existing
client using the Copy From button. This button can only be used if the type
list for the client in question is empty.
Instead of
repetitively inserting new types you can copy all the types from an existing
client using the Copy From button. This button can only be used if the type
list for the client in question is empty.
Click the Copy From button to display the Copy Types From form. Click the ellipsis button at the end of the Copy From field to bring up the Browse the Client File window. Select the client from whose file you want to copy types from, and click the Select button. The Copy From window appears with the selected client's number in the Copy From field. Click Save. The types are copied into the Client Types list.
If any existing types are present, a message warning that you "Can only copy if no entries exist" will be displayed. Click OK. The warning message together with the Copy From window disappears.
The action plans tab shows all action plans which have been overridden at client level. Refer to the Action Plan & Response Overrides section of Action Plans for more information.
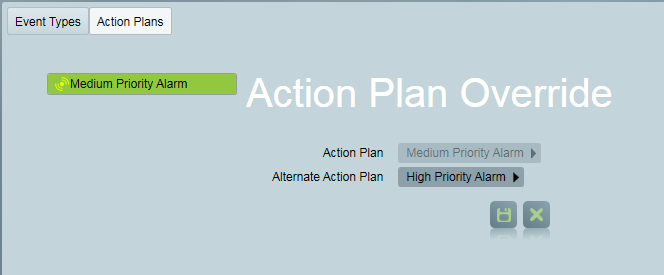
Action Plan overrides can be configured on the action plans tab. These overrides only apply to this particular client. The action plan to override is selected, and then the alternate action plan is specified. In the example above the Medium Priority Alarm action plan will be replaced with the High Priority Alarm action plan, in all cases used by this client.
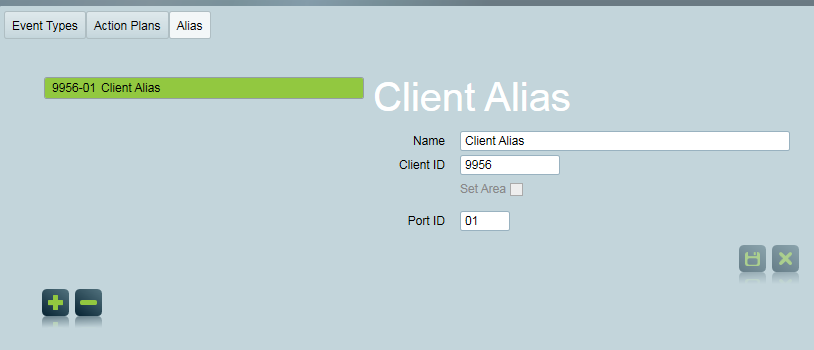
The Alias tab allows you to define alternative Client ID's from which a Client can receive signals. A client alias is a virtual client with a Name and Client ID which receives signals and reroutes them to the main client. It does not count to your total monitored Clients.
This is useful if you have a Panel or device that you need to send to re-target to a new client when it cannot be configured easily or for a setup where two or more devices are sending signals to the same client.
To set up an Client Alias add one using ::::, give it a name and unique set of Client ID information. The Client ID cannot match the details of a currently existing Client, the alias feature requires unused Client information.
Clients can be given multiple different Aliases and these do not count to your monitored Client's license limits.
Previously the Client alias feature was a way to support Dual Monitoring which has been superceded by the Add-on Template method described on the Dual Monitoring page. Configurations using the old Client Alias feature will remain functional, but they can not be changed and new ones can not be made.
The Template Selector directs the program to a template or another client where relevant types have already been set up and can be reused for the currently selected client. The Template Selector is preferable to copying types for two main reasons:

To activate this feature click the Use Template check box, then select an appropriate client number by clicking the Template Selector. This displays the Template PopUp. Locate the Client/Template whose types you wish to use e.g. CID1-01 Contact ID Template, and double click to select the template.
The client's number will then appear in the Template Selector. The Templates types will be displayed in the types window, with the template indicator icon. The tooltip on the template indicator icon will say which template the event type is coming from, as the template may be using template chaining.
If the Use Template box is checked for a particular client the program will refer to the Template number for event interpretation whenever it receives signals for that client.
Templates can also refer to other templates. This is called Template chaining. Up to 3 templates can be linked in this manner. This allows event types common to a number of templates to be referenced, instead of copied into each template. Base account reference to the template selector does not apply when template chaining.
Types added from the Client override those referenced from a Template. This also applies to template chaining, where a template can override an event type from a template it references.
Eg. if a particular client record has a Template that contains Type No 110 as an alarm type but its own types contain Type No 110 as a closing type the program will interpret a signal of type 110 as a closing.
Also see Format Interpretation, Template Maintenance, and Receiver and format Templates.
The interpreter option generally changes the way the format is interpreted for this client. See Signal Interpretation for details on each option.
The convert type option makes it easier to set up types and zones, by showing the data in a way that matches the signal format.
Four By Two. The type number is also shown in 4x2 format. For example, Patriot Event Type 14 would be converted and shown as (E)
SIA. The type number is also shown in the two-character SIA format. For example, type 8513 would be converted and shown as BA.
Scantronic. The type number is also shown in the scantronic format. For example, type 17153 would be converted and shown as C 1.
IRFast. IRFast affects the zones tab. When IRFast converter is enabled, the module input on the zone record is changed to show the IRFast module type, as well as the number of that module. For example, to configure a zone on Big Expander 2, you would select Big Expander and enter module #2.
Area codes (also called partitions and group codes) allows one panel to be split into separate areas. The area code is the last four digits of a client number. If a client has monitoring in different areas the same client number can be used with different area or group codes.
Normal. All signals are logged to the area as designated in the signal received.
Ignore. This option should only be set on base accounts unless you are operating in Legacy or Mixed Base Account Mode (Read SystemWideSettings for more detail) in which case it may be set on an area 0001 account. If this option is set on a non-base account it will have no effect.
If Base Account Mode (System Wide Settings -> Data Service Settings) set to Legacy, when a signal is received with the same client ID but a different area (group), and there is no account set up on that area, it will be logged to the area 0001 account.
For example:
If Base Account Mode set to Mixed, when a signal is received with the same Client ID but a different area (group), and there is no account set up on that area, it will be logged to the area 0001 account, if 0001 account doesn't exist, then the signal will be logged to the base account if the base account is set up
For example:.
If Base Account Mode set to Standard, when a signal is received with the same Client ID but a different area (group), and there is no account set up on that area, it will be logged to the Base Account.
For example:
Because the area accounts are checked first, if you want to be sure that all signals for that client ID go to area 0001/base account, you will need to delete any other accounts with the same client ID (including GHOST accounts).
Use Zone. When a signal is logged for a particular client, this signal can be redirected to another area of this client, depending on what zone was logged. Set group code to Use Zone in the client that initially receives the signal. Then make sure that the appropriate zone doesn't exist in this area, and does exist in the area you wish the signal to be redirected to. Zone templates are not referenced, so the zone must exist in the client itself. Its recommended that the zone only exist in one other area of the client. If the zone exists in more than one area, there is no guarantee which area will be used. Also see Use Zone Group Code Interpreter.
This option is only available if the Non-Monitored Accounts module is included in the Patriot license. This module allows clients who aren't actively monitored to be stored in the Patriot database, but not to use up a full monitored client in the license. The number of monitored and non-monitored clients is calculated separately, and the totals are displayed in the Help window.
When a client is marked as Non-Monitored, any signals received by this account won't be logged against this account but instead redirected to the SYST(01)-01 Client. Most information relating to the signal is also removed before the signal is logged. If the Log Non-Monitored signals system setting is unchecked, the signal will be ignored completely.