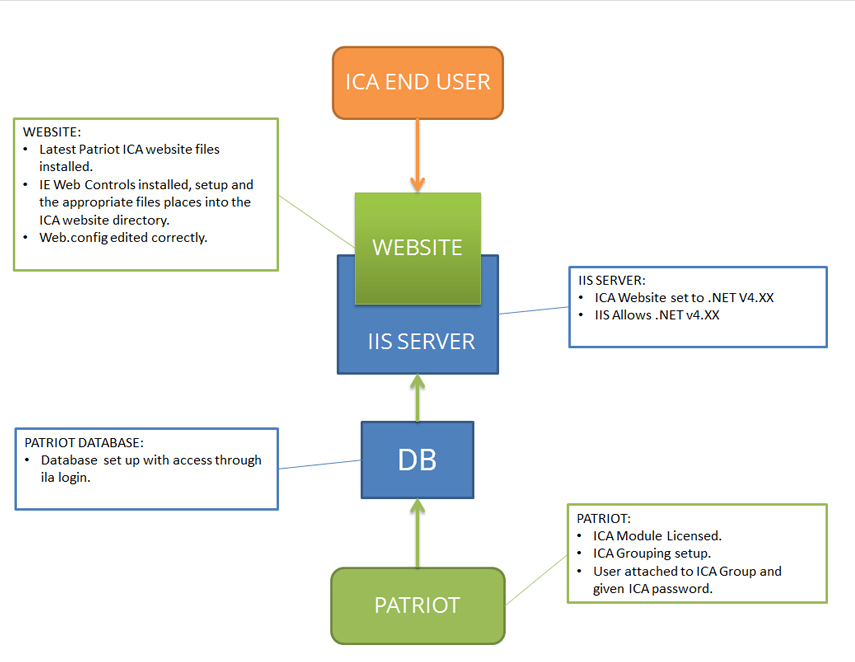
Make sure that Patriot version is 6 or newer.
Run the following script against the patriot database. Make sure you change the password 'Str0Ng_Passw0rd' in the script below. Choose a suitably strong password, preferably including some numbers and non-alphanumeric characters. Keep a note of this password.
This will set up an SQL user that can login and access the Patriot Database. It will grant all the necessary rights required for the ICA Website.
-- This section only needed if 'ila' user already exists.
EXEC sp_revokedbaccess 'ila'
EXEC sp_droplogin 'ila'

-- Create 'ila' security user, and grant access to Patriot db.
-- Make sure to change the password below.
EXEC sp_addlogin 'ila', 'Str0Ng_Passw0rd','patriot'
EXEC sp_grantdbaccess 'ila', 'ila'
GRANT SELECT ON ActionPlan TO ILA
GRANT SELECT ON Attend TO ILA
GRANT SELECT ON CallChain TO ILA
GRANT SELECT, INSERT, UPDATE, DELETE ON Calllist TO ILA
GRANT SELECT, INSERT, DELETE ON CalllistUserGroupings TO ILA
GRANT SELECT ON Cities TO ILA
GRANT SELECT ON Countries TO ILA
GRANT SELECT, INSERT, UPDATE ON MZone TO ILA
GRANT SELECT, UPDATE ON Memalarm TO ILA
GRANT SELECT ON MemalarmBg TO ILA
GRANT SELECT, INSERT, UPDATE ON MUser TO ILA
GRANT INSERT ON OperatorLog TO ILA
GRANT INSERT ON RecSigs TO ILA
GRANT SELECT ON OpenClosTimes TO ILA
GRANT SELECT ON PanelTypes TO ILA
GRANT SELECT ON Reason TO ILA
GRANT SELECT ON Reminders TO ILA
GRANT SELECT ON Signal TO ILA
GRANT SELECT ON States TO ILA
GRANT SELECT ON Tasks TO ILA
GRANT SELECT ON UserGroupings TO ILA
GRANT SELECT ON UserGroupingAP TO ILA
GRANT SELECT, INSERT, UPDATE ON UserToClient TO ILA
GRANT SELECT ON UserToUserGroupings TO ILA
GRANT SELECT, INSERT ON WebAccess TO ILA
You can test the script has run correctly by, still on the SQL server, bringing up a command line prompt and enter:
And then enter the password.
This will log you into SQL. Type exit to exit out of the SQL Command line utility.
You can check what versions of .NET are installed by looking in Control Panel under Programs and Features, or "Turn Windows Features on or off".
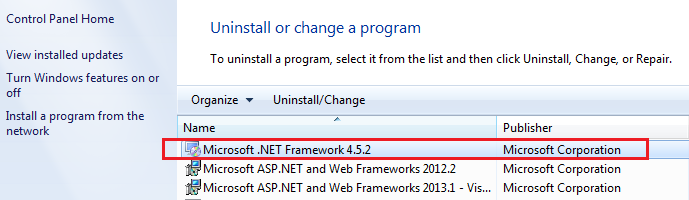
If you don't have .NET V4.XX installed, download and install it from the official ASP.Net website: www.asp.net
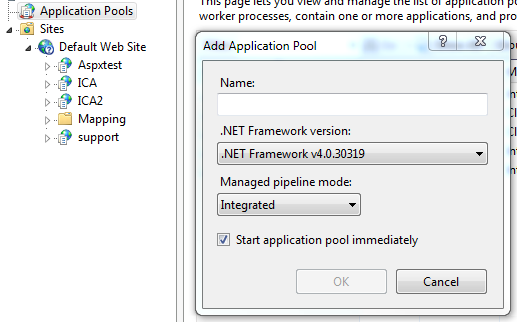
Once you have the .NET Framework 4.5 installed, you should be able to add an Application Pool to Internet Information Services (IIS) which uses version 4.5:
Open IIS
Select 'Application Pool'.
Click on 'Add Application Pool'.
This will display a window with a dropdown box of available .NET versions. This should include .NET v4.XX as shown below. Note that this will display as v4.0.x, even if you have installed version 4.5.
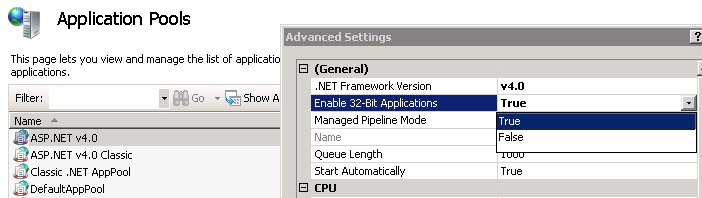
Enable 32 bit applications within your .NET Framework v4 AppPool:
If you are using IIS v6 or v6.1 you need to make sure that ASP.NET v4 has status Allowed.
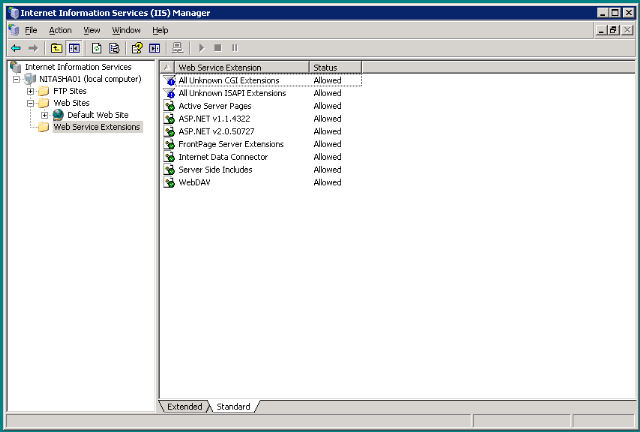
In IIS v6 this setting is under Web Service Extensions:
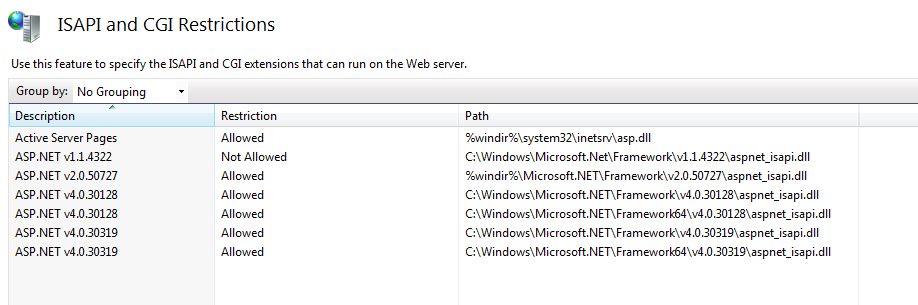
In IIS v6.1, the setting is under ISAPI and CGI Restrictions (setting visible under the home folder):

Download the Patriot ICA Install Files (ICAInstall64.exe) from the ICA downloads page on the Patriot website.
Create a folder under default website folder (usually c:\Inetpub\wwwroot by default) called 'ICA'. Run ICAInstall.exe and extract all contents into the ICA folder(C:\Inetpub\wwwroot\ICA).
Run IIS
Change settings on the ICA folder to Application.
If SSL certificate is installed, under SSL Settings, tick Require SSL.
Go into the ICA folder, and find the file appsettings.config (you may have to show system hidden files). Edit this file with Notepad.
Set Site ID: Replace xxxx (or the 4 digit number after key=") in the keys with a chosen 4 digit code. This will be your Site ID for your monitoring station, and will be used when logging in to the ICA website, as part of the username.
Examples:
| Key Name | Change to |
|---|---|
|
key="xxxxDBConn"
|
key="1000DBConn"
|
|
key="xxxxHomePage"
|
key="1000HomePage"
|
|
key="xxxxStationName"
|
key="1000StationName"
|
When a user logs into the ICA Website, their username will be the Site ID + their Patriot User ID.
Example:
| Site ID | User ID | ICA Login |
|---|---|---|
| 1000 | 2049 | 10002049 |
Connection Strings:
Replace [Webserver IP Address] with the IP address or host name of the patriot server.
Replace [ICA User Password] with the password you gave the ila user.
If you are hosting your own ICA, the value for "DBConn" should be the same as "HostDBConn". Just copy and paste the value.
Station ID:
Replace [Your Company Name] with your Monitoring station name. This name appears in web access log. Keep this under 30 characters in length.
Home Page:
Replace [Your Home Page URL] with station home page address. The page you wish your clients to go to on exit.
Station Name:
Enter in your company name. This name appears in header of each page.
Station Motto:
This appears underneath Station name.
Station Logo:
Appears above station name in page headers. Include extension, eg Logo.gif
Station Email:
Email address that feedback/change requests are sent to.
Station Email Server:
Replace with Stations smtp server.
eg smtp.gmail.com
You must also add 3 additional key entries to configure email server authentication, as follows
add key="XXXXStationEmailLogin" value=""
add key="XXXXStationEmailPassword" value=""
add key="XXXXStationEmailSSL" value="NO"
If your email server does not require authentication, enter the keys as above, otherwise fill in the authentication details. SSL can be enabled by changing the SSL value to "YES"
Show Header:
Make sure the following key exists. For now set the value to "YES". If you wish to use your own header and footer files, you will need to change this to "NO".
Encryption
Make sure the following key exists. Leave the value as "NO" for now.
Support for legacy IIS web server
Note: you can skip this step if you are running the latest version of IIS in Integrated mode.
<system.webServer>
<modules runAllManagedModulesForAllRequests="true" />
</system.webServer>
If your webserver is running IIS 6 (or IIS 7 in Classic mode) you will need to set the "runAllManagedModulesForAllRequests" attribute to true in the modules section of your web.config (which should be located in the same folder as appsettings.config).
After setting this attribute, you will also need to explicitly allow unverified access to your style sheets and images so they can be rendered on your user login form. You can do this by adding location sections to your web.config:
<location path="Content">
<system.web>
<authorization>
<allow users ="*" />
</authorization>
</system.web>
</location>
Allow unverified access to the Content subdirectory (style sheets)
<location path="Images">
<system.web>
<authorization>
<allow users ="*" />
</authorization>
</system.web>
</location>
Allow unverified access to the Images subdirectory
Also in web.config, if the following key exists:
Change the value of debug from "true" to "false".
Save the changes to appsettings.config and web.config
Some ICA functionality requires the web server to access the Patriot Data service. If the web server is located on the same machine as your Patriot Data service, or the connection between the web server and the Patriot server is on a secure internal connection, this communication doesn't need to be encrypted, so follow the Setup - Unencrypted. If the connection to the Patriot Data service is not via a secure internal connection then it is highly recommended secondary encryption is used to encrypt the connection, see Setup - Encrypted.
The following keys must be added to the ICA config (appsettings.config),
<appSettings>
    ...
    <add key="1000ServerName" value="PATRIOTSERVER1" />
    <add key="1000ServerPortNumber" value="8001" />
    <add key="1000ServerUseEncryption" value="NO" />
    <add key="1000ServerDomain" value="" />
    <add key="1000ServerPassword" value="" />
    <add key="1000ServerUserName" value="" />
    ...
</appSettings>
Where 1000 should be replaced with your appropriate Station ID.
ServerName needs to be set to the address of the machine hosting the Patriot Data service. ServerPortNumber needs to the same port number the Patriot clients use to connect.
No further configuration is required.
The Patriot Data Service must first be configured so an encrypted connection can be made to it. A windows user also needs to be created to authenticate against. See Encrypting Communication.
To enable secondary encryption, edit the PatriotService.exe.config file in the Patriot Data Service installation folder. Look for the <PatriotService.Settings1> section, and locate the following setting:
<setting name="EnableSecondaryEncryption" serializeAs="String">
	<value>False</value>
</setting>
Change the value to True to enable this mode, if this setting is missing from your configuration file, add it below the other settings.
The default port used by this service is 10001. To change this port number, open the PatriotService.exe.config file using a text editor, the secondary port is set as follows:
<setting name="EncryptedServicePortNo" serializeAs="String>
	<value>10001</value>
</setting>
The changes will take effect the next time that the Data Service is restarted.
The following keys must be added to the ICA config (appsettings.config),
<appSettings>
    ...
    <add key="1000ServerName" value="PATRIOTSERVER1" />
    <add key="1000ServerPortNumber" value="10001" />
    <add key="1000ServerUseEncryption" value="YES" />
    <add key="1000ServerDomain" value="EncryptedDomainName" />
    <add key="1000ServerPassword" value="EncryptedUserName" />
    <add key="1000ServerUserName" value="EncryptedUserPassword" />
    ...
</appSettings>
Where 1000 should be replaced with your appropriate Station ID.
ServerName needs to be set to the external address of the machine hosting the Patriot Data service.
ServerPortNumber needs to be set to the encrypted service port used on the Patriot Data service.
Set UseEncryption to YES.
A windows user must be setup on the domain hosting the Patriot Data service. This user can have limited access as its only required to authenticate the password. This users credentials will be used to access authenticate access to the data service. Details of setting up this user, and configuring the data service are contained in the above link on Encrypting Communication.
The values for ServerDomain, ServerUserName, and ServerPassword must be encrypted. The easiest way to do this is to use the Patriot Client. From the login window, edit the settings, set encryption on, and set Use Alternate Authentication. This will display the 3 entry boxes for domain, user, and password. Enter in your values here, then save. From the Patriot Client installation folder, open the config file, and copy the values for these 3 fields, as they will now be encrypted.
ICA has the ability to allow reports to be run. These reports are temporarily saved onto the ICA server. Write permission to this folder must be given to the Windows User running the application pool the ICA website is running in.
These steps may vary depending on which version of IIS is being used. This example applies to IIS7.
Microsoft's ReportViewer 2010 Redistributable must also be installed on the webserver. The ReportViewer installation file is included as part of the Patriot Installer (by default this will be located on the Patriot Server, in the folder \\Program Files (x86)\Patriot Systems\Patriot Installer\). Alternatively you can download it from the Microsoft website.
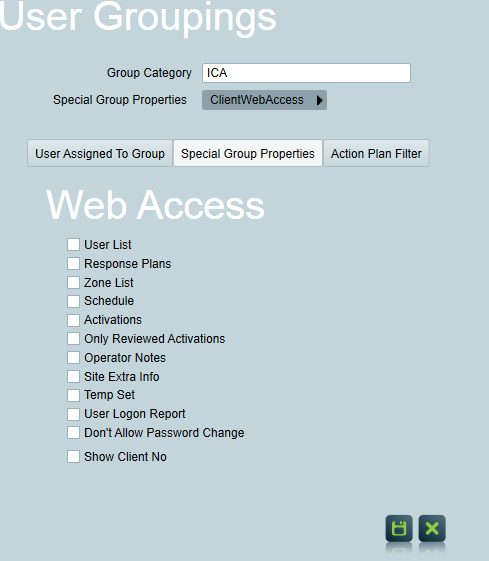
Full documentation on ICA User groupings and access rights can be found in ICA User Setup. A quick summary is also provided in this section.
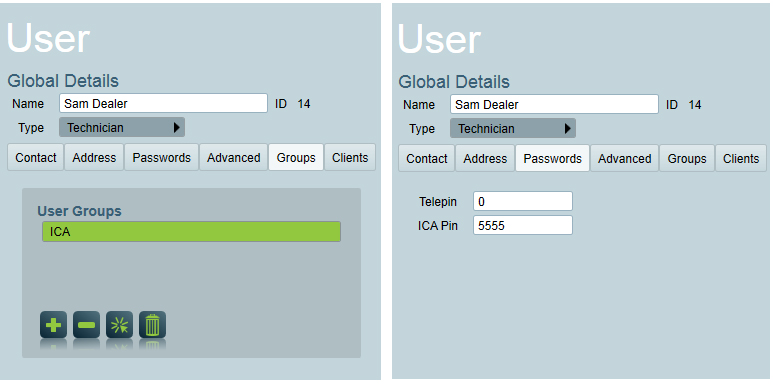
Select a site User from the Users tab of a client file or directly with the User Maintenance tool
In the Global Details section, on the 'Groups' tab assign the new ICA Group you created.
On the 'Passwords' Tab enter a password in the ICA Pin input field.
Take note of the USER ID.
Open a web browser.
In the User ID field, enter the 4 digit Site ID code (you used in the appsettings.config), followed by the user's User ID, then use the ICA Pin you entered for this user.
In our set up example, the User ID is 14, and the Site ID we used was 1000. This would make the User: 100014 and the Password: 5555.
Once you have logged in, you will have access to view all the Patriot Clients that this user has been assigned to.
If you have the Advanced ICA module registered your users will have access to a number of advanced features including site user, alarm response and schedule maintenance.
Each advanced ICA function has a corresponding security right which can be assigned to individual ICA access user groupings via Maintenance -> Users -> User Groupings within Patriot.
For additional security, the database connection string should be encrypted.
Go into the ICA folder, and find the file appsettings.config (you may have to show system hidden files). Edit this file with Notepad.
Copy the value of the "HostDBConn" key
Startup a browser and login to ICA. Then enter the following URL into the address field of your browser,
This should display the Test Encryption Page. Paste the value of the "HostDBConn" key into the Data To Encrypt field. Don't include the " " around the connection string. Press the Encrypt button, this should display an encrypted string in the Encrypted Data field. Copy this string, then go back into the appsettings.config file, and paste it into the value of the "HostDBConn" key and the "xxxxDBConn" key.
Alter the "UseEncrypt" key in the appsettings.config file and change the value to "YES"
Save the changes to the appsettings.config file. And test logging in to ICA.
Remove the file testencryption.aspx from the ICA folder, but keep a copy of this in case you need to change the value of the connection strings.
It is possible to change the regional settings to control how dates and numbers are displayed in ICA, and also to translate all phrases used in ICA. To do this, edit the appsettings.config file. Directly underneath the <system.web> line, add in a new line as follows:
<globalization culture="en-NZ" uiCulture="en-NZ"/>
Change en-NZ to whichever regional settings you require. Click here for a list of valid culture codes.
The regional settings can also be adjusted from inside Internet Information Services Manager. Select the ICA site in the IIS settings manager, and select .NET Globalisation. In this section you can select the required regional setting from a drop-down list.
It is also possible to attempt auto-detection of the users regional settings. This is useful if your users are from different regions and require different settings. To do this, set the culture to "auto" (Auto-Detect when using IIS Manager). When auto detection is being used, the users browser selects the regional settings used (if their browser supports this feature and is configured with the correct regional settings). To specify a fallback setting if the user browser doesn't support auto-detection, you can add a : and then the fallback culture name, e.g. culture="auto:en-NZ"
The culture selected dictates what language ICA is translated into. ICA shares the same translation resources as the Patriot client. See ICA Translation for details on how to setup additional language translation resources for ICA.
ICA should be setup to match the time zone configuration setting of Patriot (System Menu -> Settings -> System Wide Settings -> Data Service Settings).
Add a new key in the appsettings.config to set the time zone support mode of ICA
where XXXX is replaced by your monitoring station ID. The value should be one of "Disabled", "Legacy", or "Standard", so it matches the Patriot System settings for time zone mode.
If you are using Legacy mode, you must also add 2 new key entries to the appsettings.config file, as follows
where XXXX is replaced by your monitoring station ID. If you don't require time zone support, enter the keys as above. If you do require time zone support, 0000 can be replaced with the start and end dates of daylight saving for the monitoring station, in the format of DD MM
The default time for the ICA webpage logout is 20 minutes, there are couple of ways to increase the session timeout:
Open the web.config in your ICA folder, under system.web node, provide the follow code:
<sessionState timeout="60" />
Under <authentication mode="Forms"> node, add timeout attribute in the following key :
<forms name="SampleAuth" loginUrl="UserLogin.aspx" defaultUrl="memalarm3.aspx" slidingExpiration="true" timeout="60"/>
Save the changes to web.config, this will set the ICA logout timeout to 60 minutes.
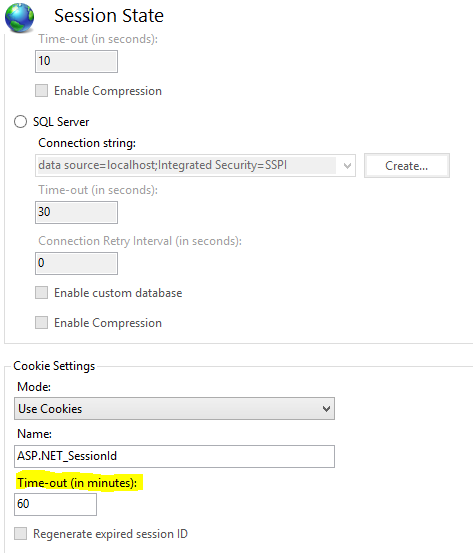
Open your IIS and go to your ICA website.
Click on Session State under ASP.net
Scroll down to Cookie Settings.
Here you can change the Session Timeout as shown in the figure.
For details on how to edit the way ICA looks, go to ICA Customisation.