Creating a new Standard Web Access Grouping
This document assumes that the Patriot ICA module has been installed. This document covers setting user access levels and giving users access.
The internet client access module allows users access to the site information via the internet using a standard web browser. Patriot contains flexible configuration settings for allowing different levels of access to your users. Firstly you need to setup various user groups with special web access privileges. Then you need to assign one of these groups to each user that requires web access.
Patriot uses standard user groupings to define the different levels of web access that you can allocate to your users. In this document we will cover setting up two groups, one for standard access and one for supervisor access. If you require more flexibility, you may create as many groups as you require.
Go to Maintenance -> Users -> User Groupings.
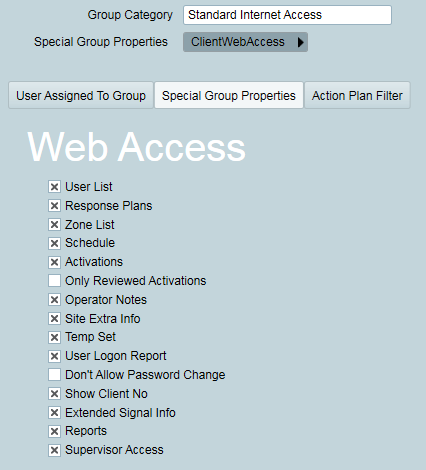
If you switch to the Special Group Properties tab, you will see a list of security options. These allow you to specify the level of access that users in this group will have. By default the group has no access rights.
User List: Show the user list of the selected site.
Response Plan: Shows the response plan tab of the selected site.
Zone List: Shows the zone listing of the selected site.
Schedule: Shows the tab schedule of the selected site.
Activations: Shows the activations tab of the selected site.
Only Show Reviewed Activations: Only applies if the Activations tab is visible. Id selected, only reviewed activations are displayed. You designate activations as reviewed from the completed activations browse. This allows for a filtering and a delay before activations are presented to your users.
Operator Notes: Again, only applies if the activations tab is visible. When an activation is selected, the operator notes will only appear if this option is selected.
Site Extra Info: Display sites extra info.
User Login Report: Should only be given to monitoring supervisors. If selected, a link appears on the site list page for the user report. This user report lists each user that has accessed the ILA module, and lists the date and time of each access.
Don't Allow Password Change: If this is selected, the user is not able to change there password online, from the Available Sites screen.
Temp Set: As of writing this document this feature is not fully functional. Turning this on will allow the user to Temp Set the site.
Show Client No: Displays the Full Client No.
Change User Details: Updates can be made to existing site users.
Insert New Users: New site users may be inserted.
Change Zone Details: Updates can be made to existing site zones.
Insert New Zones: New site zones may be inserted.
Change Schedule: Updates can be made to a site's schedule.
Test Mode: Sites may be placed into Test Mode.
Edit Response Plan: Updates can be made to a site's response plan.
Reports: Site reports can be generated.
Extended Signal Info: Additional info about each signal is available on the site history. This option requires the IDA module.
Change User Details: Gives editing rights to user list details.
Insert New Users: Allows new users to be created and assigned to current site.
Change Zone Details: Gives editing rights to zone list details.
Insert New Zones: Allows new zones to be added to sites.
Change Schedule: Allows user to edit the opening and closing times of a site. (Only applies if the site uses Auto Status Monitoring).
Edit All Test Mode: Allows user to enable/disable test mode at client and zone levels.
Edit Response Plan: Allows user to make changes to response plans (change call order, add users to the call list, etc).
Add New Test Mode Only: Allows user to enable test mode at client and zone levels, but they cannot cancel any test modes that were set up by another user or operator.
This will determine what signals and activations are displayed to the user. You can choose to exclude some action plans, or to only include some action plans. For performance reasons, pick the option which requires the fewest action plans to be selected.
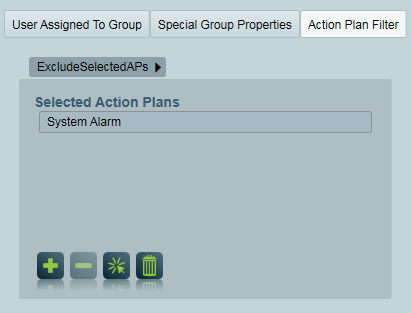
For our Standard Internet Access example, select User List, Schedule, Activations, and Operator Notes. Leave Action Plan Filter set to None. Now save the group.
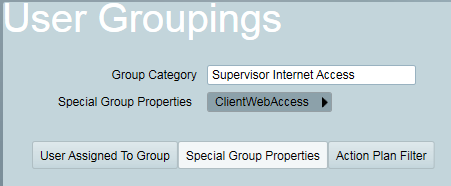
Insert a new user grouping. Give it a name of Supervisor Internet Access.
Access is granted to users, not clients. There are two parts to this:
When a user logs in, they will have access to the following clients:
If you don't want to give an existing user access to every client that they have have been assigned to, you will need to create another user, and assign them only to the clients that are required.
There are two things that must be configured before a user can gain access via the internet:
ICA Password: Open the users tab, or the user maintenance screen. Switch to the "Passwords" tab of the user.
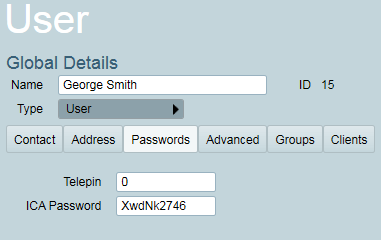
Enter a web access password for the user here. It is important that you choose a strong password. If the user chooses to update this password later via the ICA web-interface, minimum password strength requirements will be enforced.
User Groups: The user must be assigned to a user group that has Client Web Access selected as a Special Group Property. (See Creating a Standard Web Access Group above.) When editing a user, switch to the Groups tab, and assign either the Standard Internet Access group or the Supervisor Internet Access Group to this user.
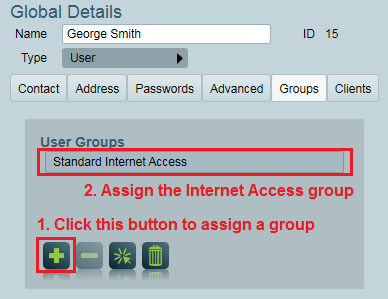
The group you assign will decide what level of access this user has. The information that can be viewed or edited is configured in the User Group special options.

Make a note of the User ID. This forms part of the User login that the user must enter to gain access.
Note: for IDA Module users - a dealer user's assigned engineers are given ICA access by setting up the same two settings above, but this should be done on the Engineers tab of the Dealer Maintenance window. See Dealer Guidelines for more info.
When the ICA module was installed, you should have been set up with an address that you can open in your web browser to log into ICA. This address can be linked to from your existing website. You should have also received a 4 digit Station ID that is used as a prefix for user logins.
Open the ICA login page.
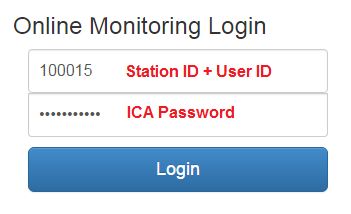
The user ID that must be entered is made up of the 4 digit station ID, followed by the User ID. Then enter in the password for the user (see ICA Password above). The User can change this password from within ICA, once they have successfully logged in. After entering in your user id and password, you should see a list of all the sites assigned to this user.