 Add a new task
to the list in the Task Settings window. Double click on Email in the drop down
list in the details area of the window.
Add a new task
to the list in the Task Settings window. Double click on Email in the drop down
list in the details area of the window.The Email Task is an optional add-on module. You will need to have your software re-registered with the Emailing Task enabled before it can be installed.
The Patriot 6 Email Module provides a powerful email capability allowing reports to be emailed to clients as an Acrobat PDF format file attachment. Acrobat PDF Readers are freely available on the Web and your clients will easily be able to obtain a copy of Acrobat Reader if they don't already have the program installed.
Another feature of the Email task is that it can be assigned to an Action Plan. Then when a signal that has that Action Plan assigned to it is logged, an emailed text message is sent to the clients User(s) specified. In this situation an email message can be manually or automatically generated. some previous patriot versions require the installation of the supplied patriot PDF driver on any machines running reports. But Patriot 6 does away with this dependency and no other software is required.
This document will cover all areas needed to set-up and use the email task.
After working through this document you should proceed to How-To Email and Fax, Report Recipients that follows on and covers:
� Setting up the Fax, Report Recipients in the database.
� Manually Running a Fax or Email Report.
� Setting up Automated Reports to send to the email task.
If you want to be able to send an email message to users when particular signals are received you will also need to read Instant Messaging Tasks
System Menu Item -> Tasks -> Task Settings
Please read TASK SETTINGS for general information about adding tasks.
Add a new task
to the list in the Task Settings window. Double click on Email in the drop down
list in the details area of the window.
 Click the next
button to continue. The Email task settings form will appear.
Click the next
button to continue. The Email task settings form will appear.
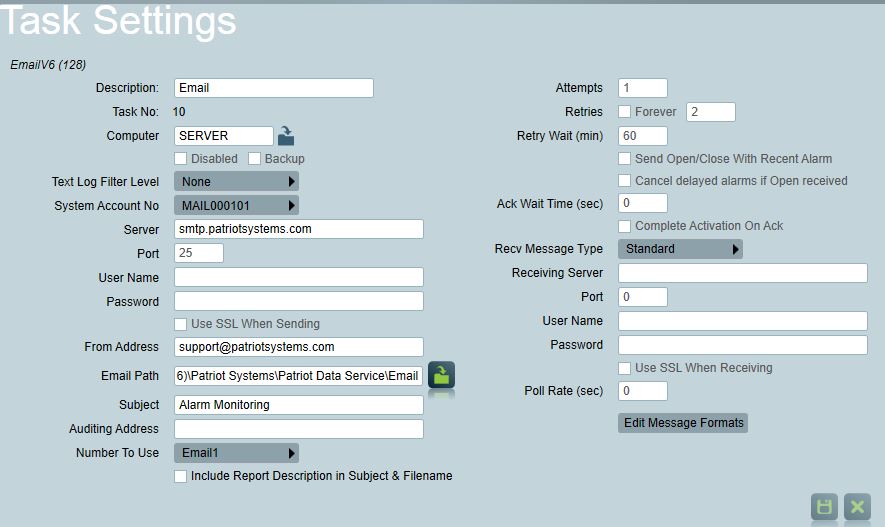 Email Task Settings
Many of the settings relate to notifications sent using the Email task. This can be used where guards or clients may want email notification of certain alarms, opens and closes, etc.
Enter a Description of the task, e.g. Email.
The Task No will default to the next free task number.
Select the Computer that this task is to be run on. This must be the Server computer. Use the button on the right of the text box to fill the field with this computer's name if the Email task is to be run on this computer.
Backup: Check this box if you wish this task to be defined as a backup task.
Text log filter level: This should be set to None, unless you temporarily need to enable logging to determine the cause of a technical issue. For more information see Task Diagnostics and Task Troubleshooting.
Enter a System Account No. The system account number is used to log error and system generated signals against. E.g. MAIL000101 (client MAIL area 0001 Port ID 01). If this account does not already exist you will need to set it up as a template under Maintenance -> Clients -> Templates, and insert the system-generated types that relate to the email task. For more information see System Generated Types.
Enter the Server (smtp). This is the name of the SMTP (Simple Mail Transfer Protocol) Server that handles your email. Remember to use the format server.domain not server@domain, as this is known to be the cause of many relay problems. E.g. smtp.patriotsystems.com, not smtp@patriotsystems.com.
Enter an appropriate Email Subject. This will be displayed in the Subject field of the email message, e.g. Alarm Monitoring.
Enter the From Address. This is your company's email address from which outgoing emails are sent.
Enter the Email Path. This is the path to the subfolder Email in the installation folder of the Patriot Data Service on the Server. (E.g. C:\Program Files\Patriot Systems\Patriot Data Service\Email\ or C:\Program Files (x86)\Patriot Systems\Patriot Data Service\Email). If the email task is not running on the same computer as where the Patriot Data Service is running, you need to enter the UNC path to that folder (E.g. \\SERVERNAME\Program Files\Patriot Systems\Patriot Data Service\Email\).
Number To Use
This selector determines which field in a Users record to obtain the email destination from. The system can obtain this from the Email 1 or Email 2 fields in a users or emergency Services record (e.g. patrols, technicians).
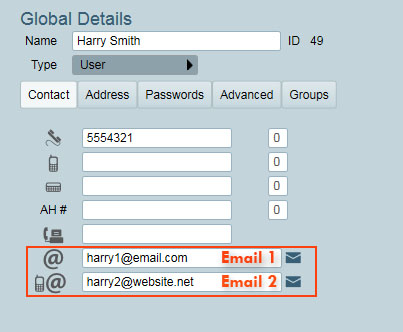
User record 'Number To Use' for Email task
Include Report Description in Subject & Filename
Applies to all emailed reports. Determines whether to include the attached report's description in the email's subject line, and in the filename of the attachment. If it is a "By User" report, the filename and subject will also include the name of the user it is intended for.
Attempts
Determines the number of times the system will try to send the Email if unsuccessful. If all attempts have failed, the system will wait the time specified in the Retry Wait field before trying again.
Retry Wait
The length of time the system waits, after it has completed the number of unsuccessful Email Attempts, before it tries again. E.g. after 5 attempts it waits 15 minutes before retrying.
Send Open/Close With Recent Alarm
Causes any set and unset signals received from a client to trigger automated messages to response members when received within a short period Within Time (Min) of an alarm event, the time can be set in System Wide Settings -> Data Service Settings -> Within Time(Min).
Note: for this option to work you must enable the system setting Send Open/Close With Recent Alarm in System Wide Settings and also enable this setting in Email task settings.
Default message detail
Specify the different fields within the client record to include in the email message. To change the default settings, disable the Default Details check box then enable each field you wish to include in the email message.
Auditing Address
If this is set, the provided email address will be added as a BCC on every sent email. This is useful for auditing sent messages and verifying which messages or reports have been sent. Note that since every single email sent is copied to this address, the inbox for this email account should be configured with a sufficiently large storage quota.
 Click Save
to save Email task settings
Click Save
to save Email task settings
Note: it may be necessary to restart the data service for any changes to the email task to take effect.
The email task can also be configured to process emails sent to a designated email address, and convert these into signals logged into patriot.
The easiest way to test the email task is to enter a manual paging message directed at the email task. In the Patriot menu, go to Maintenance -> General -> Paging Queue:
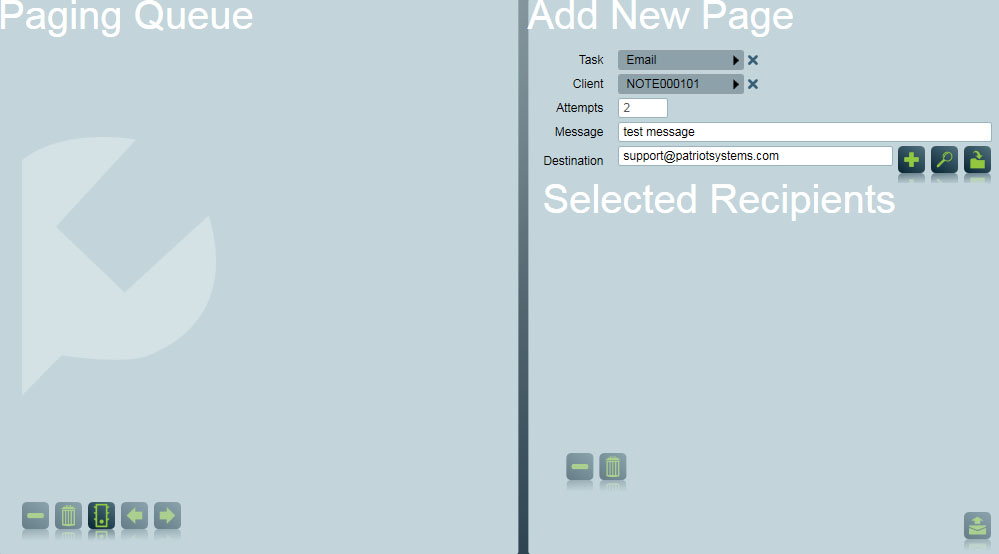
The email task will attempt to send the message to the email address you specified as the Destination. If successfully sent, this indicates that the email task is functioning correctly.
If you are still having trouble receiving notifications, check your action plans against the signal to ensure the correct action plan is being triggered. Also check that the email task has been assigned to a user in the relevant response plans.