Patriot 6 has many tasks available which can be configured to trigger automatically when certain signals are received into the system. When the task is triggered, it will send a message to a recipient containing information about the received signal.
The following are a list of tasks that can be assigned for instant messaging:
Paging PET Protocol: Sends Paging message via PET protocol paging provider
GSM: Sends SMS txt message via GSM network
SMS Gateway: Sends SMS via Clickatell SMS gateway. No hardware required.
Email: Sends email message via SMTP mail server
Telephony: Calls User and starts an outbound call chain
Smart Phone: Sends a notification direct to the phone. Also supports First Response Messaging.
Patriot 6 has a number of methods for assigning these tasks. The method or methods you use will depend on your requirements. The rest of this section will explain more about how tasks can be assigned and assist with the selection of the best method for your application.
Action Plans and Response Plans
The assigning of tasks revolves around action plans and response plans. So a clear understanding of how these work in Patriot 6 is essential before progressing.
Before proceeding, you should be able to assign an action plan at type level, client level, and global level. Although it is possible to assign action plans at zone or user level, this is usually only done in advanced situations.
You should also be able to assign a response plan to an action plan, and understand how users can be assigned to a response plan at client level and global level.
When a signal is received into the system, an action plan is assigned to the signal. The response plan associated with that action plan for this client is then used by the systems. Each user in the response plan can have one or more tasks assigned to them. As many users as you wish can be assigned tasks in the response plan. Each task that is assigned to a user in this response plan will trigger, sending a message to the user that the task is assigned to.
Messaging Queue
For each task assigned to each user, a message will be placed into the messaging queue, and remain there until it has been successfully sent, or reaches it number of maximum retires. The messaging queue can be used to monitor instant messaging, and manually delete messages you want to cancel.
So if User A has GSM and email assigned, and User B has GSM assigned. When triggered, 3 entries will be placed in the messaging queue. GSM to User A, Email to User A, and GSM to User B.
Note: Dependant on the speed of each task, some messages may be sent and cleared from the messaging queue quicker than the operator can view them.
Tasks are assigned to Users in the Response Plan area of the Response Tab of a client.
See ASSIGNABLE TASKS for how to do this.
The message is sent to the user who has the task assigned. The task will send the message to the address specified by the No. to Use field in the Task Settings Window.
![]()
No. to Use field
So if the GSM task has its Use field set to Mobile No, and our email task has its Use field set to Email 1, User A gets a GSM txt message sent to User A's mobile no, User A gets an email sent to User A's email address 1, User B gets a GSM message sent to User B's mobile no.
The contents of the message can be customized to meet the needs of the of the task its performing. Certain task allow for several message formats to be configured, so a particular format can be used to suit a particular task.
To configure the message format, open the task settings window, and then click on the Edit Message Formats Button.
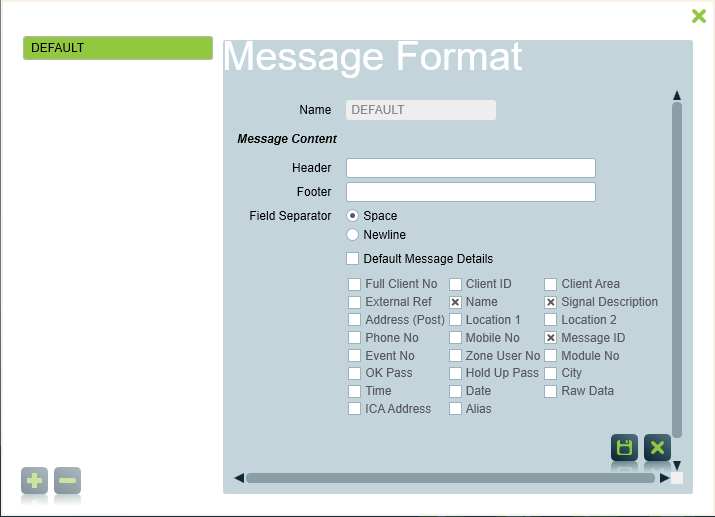
The Default message format will already exist. If the task allows it, additional message formats can be added using the plus button. Each message format can have:
| Header | Text that is added at the start of a message. |
| Footer | Text that is added at the end of a message. |
| Field Separator | Text that is used to separate each part of the message. Default is space. |
| Default Message Details | If this option is selected, the message will contain:
|
| Customized message details | If the Default Message Details option is unchecked, you can choose what information to include in the message. |
The labels for default message fields can be edited by changing the Tasks section of the Translation Resources. Some of these labels may be blank by default. Note: the ICA Address label is located in the Settings section of the Translation Resources.
For instructions on how to modify these labels, see Language Translation.
If additional message formats are defined, you are able to select which format is used when you assign a user into the response plan, see Additional Settings section of Assignable Tasks.
The best way of setting up assignable tasks depends on how your action plans and response plans have been setup.
Read the Suggestions and hints for settings up Response Plans section from the response plans document. Note that the After Hours Callout option will not work here, because it does not support assignable tasks. To trigger a task, a user must be assigned to a response plan.
One cell phone handed around to the guard on patrol
This situation is very easy to setup. If you don't already have one, create a global services template (the system comes with a standard global services template with a client id of GLOB). Create a user to represent the guard on duty (enter the cell phone number into the guards contact details), and assign this user to the global services template. Now go to Maintenance -> General -> Action Plans. For each action plan that you want paged to the guard, select the action plan, click change, Under Global Response Plan, select the Global Services Template using the folder button. Then click on Assign Response Plan, and assign the Guard to the response plan, also assign the task to the guard.
This will add the guard to all response plans (for each action plan setup by above procedure) for all clients in the database.
Client requests certain events sent directly to them
Firstly, make sure that a user record representing the client exists, and has been assigned to the client record. Go into the client, click on the Update Response Plans button, and assign the user to each of the desired action plans, also assigning the relevant task as required. Note that if you have setup a response plan for this client at client level, doing this will override the client level response plan, so you will also need to assign any other users required in the new response plan at the same time.
Patriot's instant messaging tasks all support inbound messages of various types. Each messaging task can will support a single received message type - if you need to receive different types of messages (e.g. Identicom and First Response) you will need to setup multiple messaging tasks. Recv. Message Type is selected on the instant messaging task setup screen. Some received message types are hardware specific (e.g. Identicom, Minor Planet etc.) but most common are the three generic message types: Standard, First Response & Log To Device.
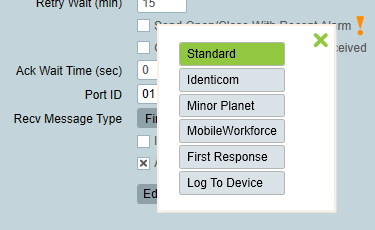
The Standard received message type is support by the GSM and Email tasks. When the Standard message type is selected, received messages must be sent in one of the formats specified here. This message type supports receiving alarm & alarm acknowledgement messages and can be used in combination with escalated messaging.
The Log To Device received message type is support by the GSM and Email tasks. When the Log To Device message type is selected, all received messages are simply logged to the client account with matching caller ID no. set on the client maintenance tab, in the Device Ref. No. field.
Received Log To Device messages are logged to the client as regular signals with the system generated type no. 65,080.
This feature requires the First Response module, and can be used with either the GSM, Email, or Smartphone Tasks.
This can allow a user the chance to respond to the activation before it is shown to the operator. The user first receives a message via SMS, Email, or the Plink App. Usually the action plan for the alarm must have the 'put to sleep' special option, to give the user a chance to respond before the activation is shown to operators. The User can then decide whether to respond to the alarm themselves, which will acknowledge and clear the activation, or in the case of Late To Close alarms they can also make temporary schedule changes that extend the closing time.
Message Reply format for First Response:
For Email and SMS notifications, the user needs to reply to messages using a specific format. There 2 options on the Task that relate to First Response.
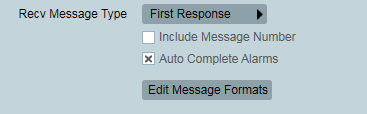
Include Message Number:
For this option to function correctly, you must either use the default message format, or enable the message ID in the message format:
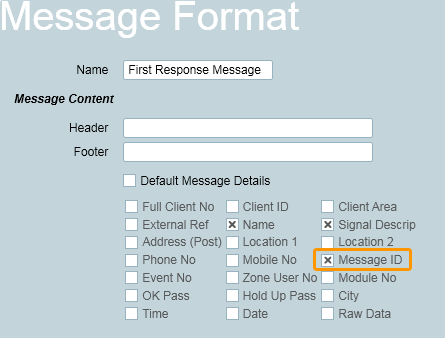
The message ID is 4 digit message number prefixed by PM, such as PM1234. If the Include Message Number task option is enabled, the reply that a user sends back must start with the same 4 digit number, in order to match up the reply with the correct activation.
Example of a first response message:
Example reply to clear the activation:
The message number is shown in green above. Note that there must be exactly one space character between the Message Number and the action to take.
In most cases it is best to have the Include Message Number option enabled, as this ensures the replies are matched up to the correct activations. If you have this option disabled, you only need to reply with the action (Y, N, or 1-9 for late to close). The replies will be matched up in time order, so when receiving multiple notifications, you must reply to the oldest message first.
Auto Complete Alarms
If this option is enabled, the user's reply can either awaken or complete an activation, or for Late to Close it can extend the closing time temporarily. The reply options are:
| Value | Action | Used for | Example | Y | Complete Activation | Any Activation | 0024 Y |
|---|---|---|---|---|---|---|---|
| N | Awaken Activation | Any Activation | 0024 N | ||||
| 1-9 | Extend closing time by the given number of hours (Maximum of 9 hours) | Late To Close | 0024 2 |
If the Auto Complete Alarms task option is disabled, any message reply will have the affect of awakening the activation (equivalent to the "N" reply option in the table above).
Respond to First Response notifications via ICA web UI:
The user can also respond to the First Response notification via ICA web UI. It requires Remote Access to be granted to the user. To make this easy for the end user you should add the ICA website link to the First Response messages sent via the GSM and Email tasks (see "Configuring the message" above).
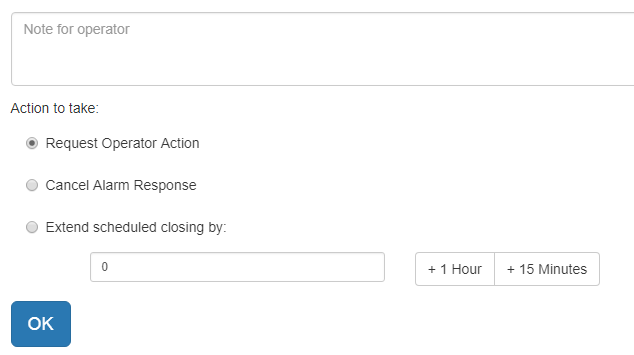
A bell button will be displayed on the top menu bar with a figure if there's any First Response notification waiting for the response of the user. Clicking on the bell button will navigate to the page listing all the notifications. The user can respond to an notification by clicking on it. The response options are different for a Late To Close alarm and other general alarms.

General Alarms:
There are 2 options for a general alarm: Request Operator Action and Cancel Alarm Response. Request Operator Action option will awaken the activation and Cancel Alarm Response option will complete the activation.
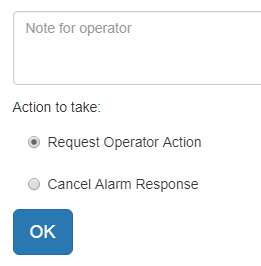
Late To Close Alarms:
Extend scheduled closing by option is only available for Late To Close alarms. It allows the user to extend the scheduled closing time temporarily.